Ocean Waves Baby Romper Free Crochet Pattern
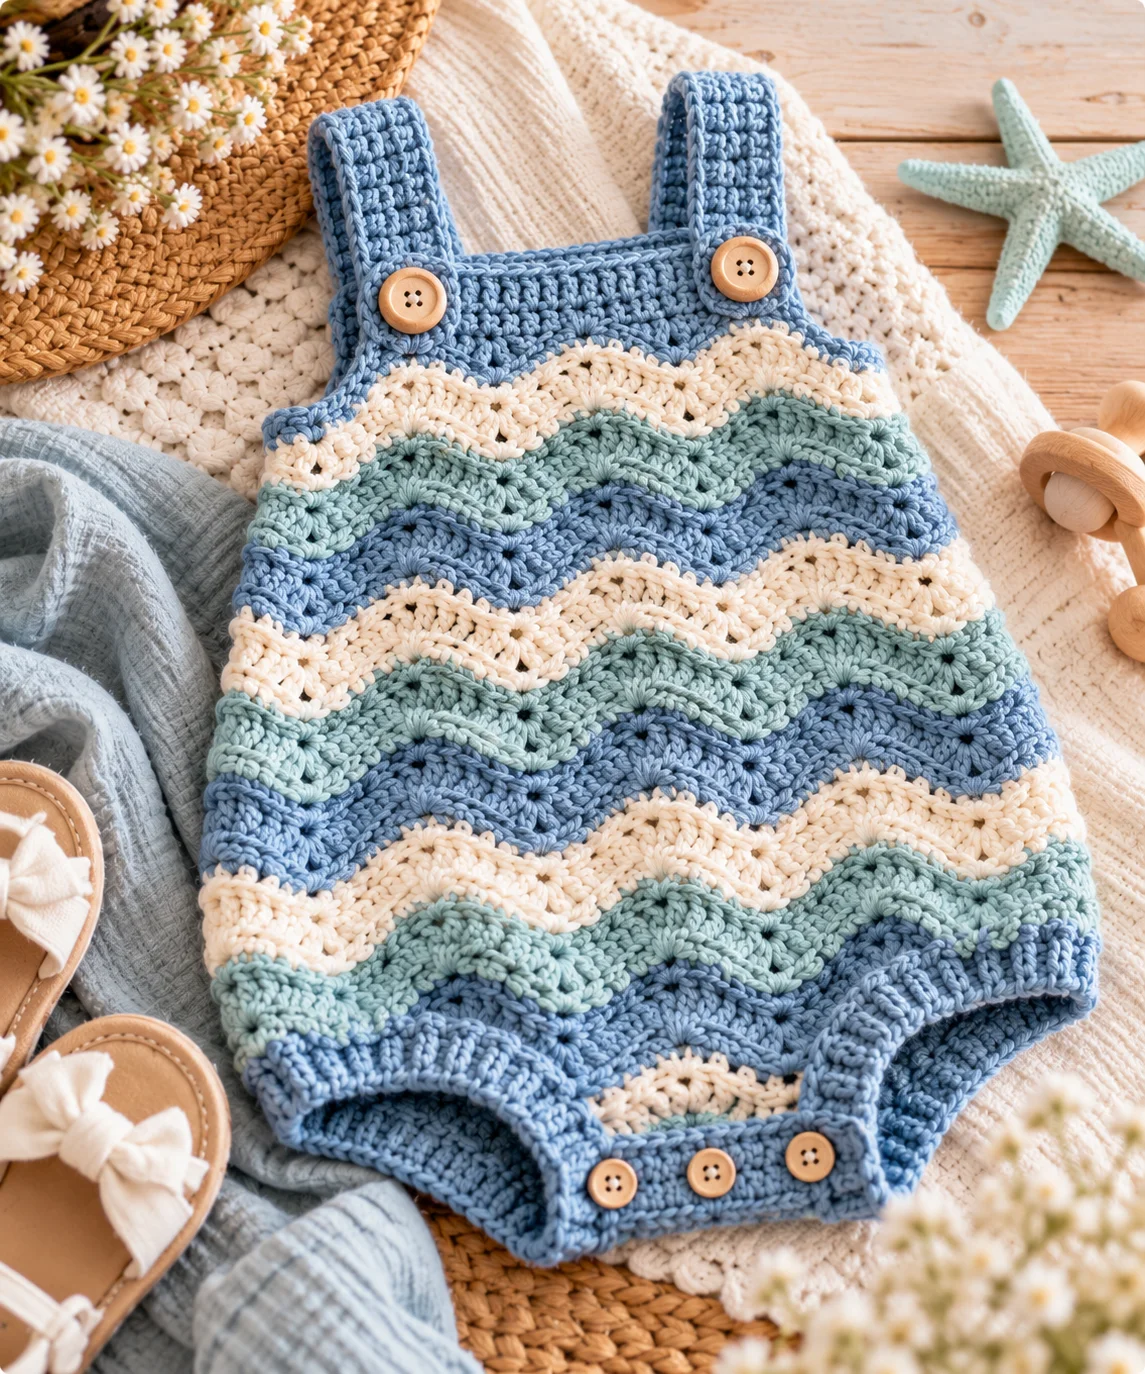
Bring a little seaside charm to a baby’s handmade wardrobe with this Ocean Waves Baby Romper.
This original crochet pattern features gently undulating rows that resemble waves rolling across the shore. Alternating shades of blue, cream, and seafoam create the ocean-inspired color palette, while the simple silhouette keeps the romper comfortable and practical.
The romper is designed as a sleeveless summer garment with a softly shaped body, button or snap-style crotch opening, and shoulder straps. The wave stitch is worked in rows, making the color changes easy to follow.
This pattern uses US crochet terminology.
Important: This is an original crochet pattern draft. Because crochet garments can vary substantially with yarn, tension, and laundering, make and measure a gauge swatch and compare the finished measurements with the baby before beginning.
Ocean Waves Baby Romper Details
- Skill level: Intermediate
- Construction: Separate front and back sections joined at the sides
- Style: Sleeveless baby romper
- Sizes: 3, 6, and 12 months
- Yarn: Lightweight DK (#3)
- Hook: 4 mm (US G-6)
- Main stitch: Wave/ripple stitch
- Terminology: US crochet terms
- Closure: Sew-on snaps recommended
- Colors: 3
The size chart is based on standard baby body measurements. The Craft Yarn Council lists chest measurements of 16 inches for 3 months, 17 inches for 6 months, and 18 inches for 12 months.
Finished Measurements
These are the approximate finished garment measurements.
| Size | Finished Chest | Body Length* |
|---|---|---|
| 3 months | 17 in | 13 in |
| 6 months | 18 in | 14 in |
| 12 months | 19 in | 16 in |
*Body length is measured from the top of the shoulder area to the lower crotch before adding the shoulder straps.
Because babies vary considerably in proportion, compare these measurements with a garment that currently fits well whenever possible. The Craft Yarn Council also recommends reviewing actual body measurements when selecting garment sizing rather than relying only on age labels.
Materials
Yarn
Use a soft DK/light worsted (#3) yarn suitable for baby clothing.
Approximate amounts:
Color A — Ocean Blue
- 100–125 yards
Color B — Seafoam
- 60–80 yards
Color C — Cream
- 45–60 yards
The exact amount will depend on size, yarn brand, tension, and the length of the romper.
Choose a washable yarn with good stitch definition. Cotton, cotton blends, and soft washable acrylic are practical choices for baby clothing.
Additional Supplies
- 4 mm (US G-6) crochet hook
- Tapestry needle
- Scissors
- Stitch markers
- 3–4 small sew-on snaps
- Measuring tape
Crochet Abbreviations
- ch — chain
- sc — single crochet
- hdc — half double crochet
- hdc2tog — half double crochet 2 together
- sl st — slip stitch
- st/sts — stitch/stitches
- sk — skip
- rep — repeat
- RS — right side
- WS — wrong side
- BLO — back loop only
Gauge
Work a swatch using the wave stitch.
18 stitches × 12 rows = 4 inches
The wave pattern should be measured after lightly laying the swatch flat rather than stretching it.
If you have too many stitches in 4 inches, move to a larger hook.
If you have too few stitches, use a smaller hook.
Gauge is especially important for baby garments because even a small difference in stitch size can change the chest measurement significantly.
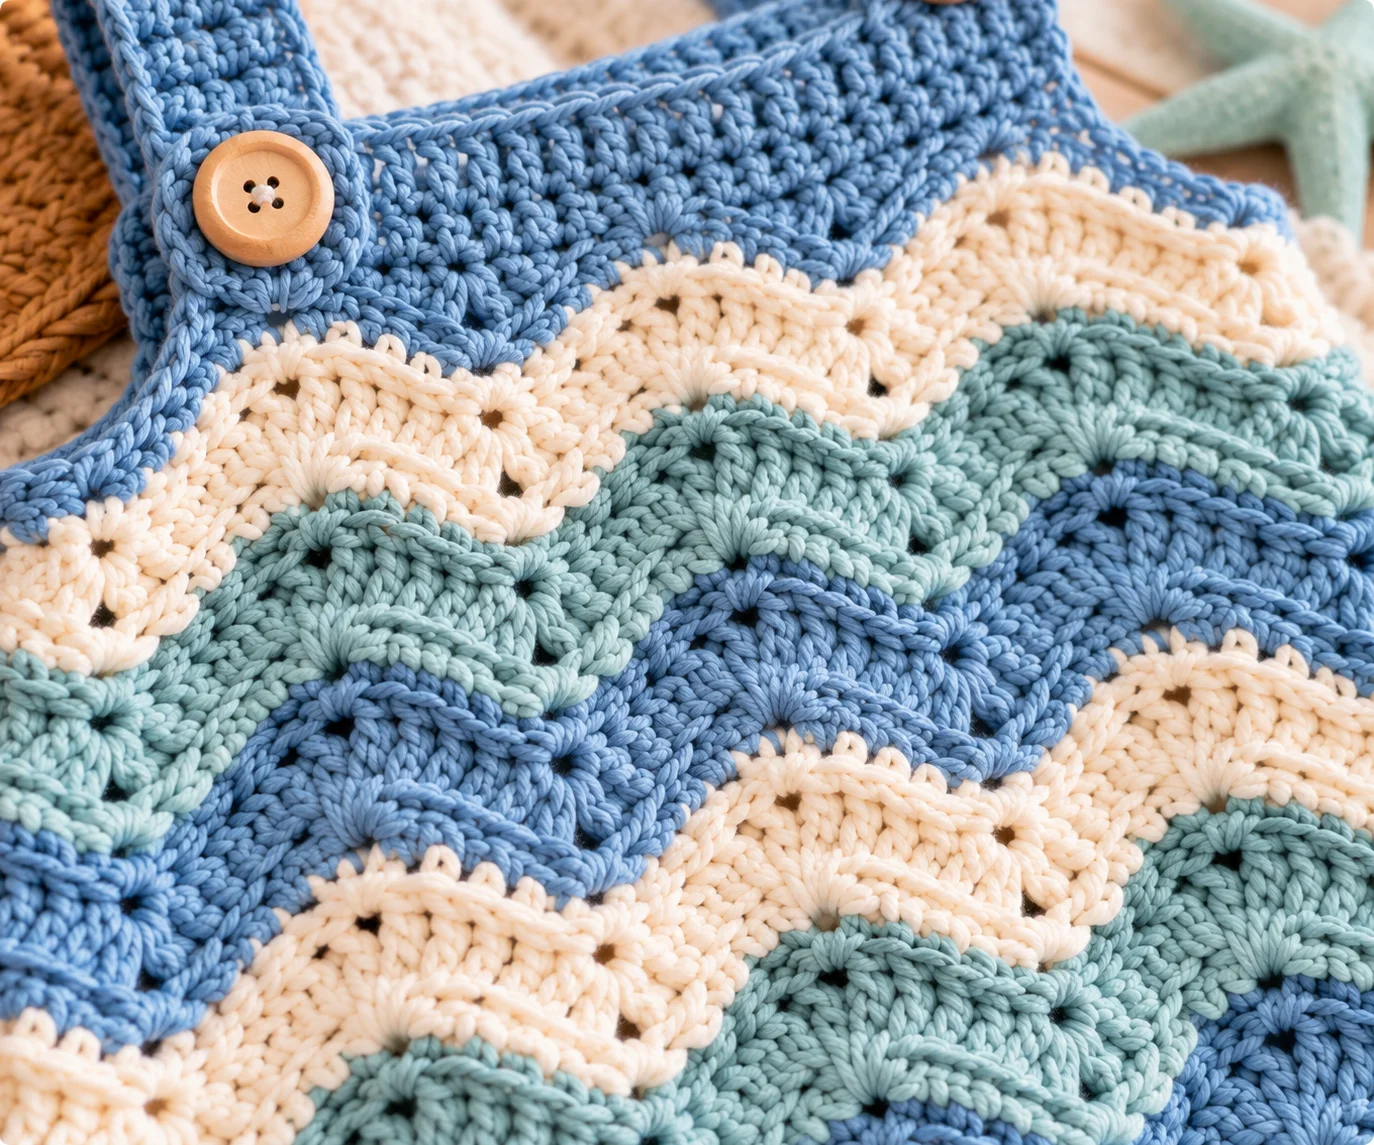
Understanding the Ocean Wave Stitch
The wave pattern is created by alternating increases and decreases.
The increase section creates the crest of the wave, while the decreases create the valley.
The stitch sequence is worked over a 12-stitch repeat.
Wave Repeat
Work:
- 2 hdc in the next stitch
- Hdc in each of the next 3 stitches
- Hdc2tog over the next 2 stitches
- Hdc2tog over the next 2 stitches
- Hdc in each of the next 3 stitches
- 2 hdc in the next stitch
The increase and decrease sections balance each other, allowing the stitch count to remain consistent.
The first time you work the pattern, count the stitches after every repeat.
Color Sequence
The ocean effect comes from changing colors in a predictable rhythm.
Use:
- Color A: Ocean Blue
- Color B: Seafoam
- Color C: Cream
A simple sequence is:
2 rows Color A
2 rows Color B
2 rows Color A
2 rows Color C
Repeat the sequence throughout the body.
You can also make the romper more subtle by using only two shades.
Front Body
The front is worked from the lower edge upward.
Size 3 Months
With Color A, ch 61.
Size 6 Months
With Color A, ch 65.
Size 12 Months
With Color A, ch 69.
These chains provide the starting width for the body while allowing the wave pattern to be distributed across the garment.
Row 1
Sc in the 2nd ch from hook and across.
Turn.
Row 2 — Beginning the Wave
Ch 1.
Work the Ocean Wave stitch across the row.
Your stitch count should remain equal to the number of stitches established in Row 1.
Turn.
Row 3
Ch 1.
Sc across.
Turn.
Row 4
Ch 1.
Work the Ocean Wave stitch across.
Turn.
Row 5
Ch 1.
Sc across.
Turn.
Continue the Wave Pattern
Repeat Rows 2–5, changing colors according to the stripe sequence.
Continue until the front section measures approximately:
- 7½ inches for 3 months
- 8½ inches for 6 months
- 10 inches for 12 months
from the lower edge.
End after a single crochet row.
Shape the Upper Body
The upper portion of the romper becomes slightly narrower to create the arm openings.
The shaping is worked by decreasing at both sides.
3 Months
Work one decrease at each side of the next four rows.
After the decreases, continue straight until the upper body measures approximately 3 inches.
6 Months
Work one decrease at each side of the next five rows.
Continue straight until the upper body measures approximately 3½ inches.
12 Months
Work one decrease at each side of the next six rows.
Continue straight until the upper body measures approximately 4 inches.
Keep the center stitches unchanged.
Front Neckline
The neckline is shaped by dividing the remaining stitches into three sections:
- Left shoulder
- Neck opening
- Right shoulder
For a comfortable baby neckline, the neck opening should be approximately:
- 3½ inches for 3 months
- 4 inches for 6 months
- 4½ inches for 12 months
Work each shoulder separately.
Decrease one stitch at the neckline edge on the first two rows.
Continue without further shaping until the shoulder reaches the desired length.
Fasten off.
Repeat for the opposite shoulder.
Back Body
The back is worked in the same general way as the front, but the neckline remains higher.
This creates more coverage while keeping the romper comfortable.
With Color A, make the same foundation chain used for the corresponding front size.
Work:
- Single crochet foundation row
- Wave row
- Single crochet row
- Wave row
Continue the stripe sequence until the back reaches the same underarm height as the front.
Back Armholes
Shape the back armholes using the same side decreases as the front:
3 Months
Decrease at both sides for 4 rows.
6 Months
Decrease at both sides for 5 rows.
12 Months
Decrease at both sides for 6 rows.
Continue straight after the shaping.
Back Neckline
The back neckline should be shallower than the front.
Work across the first shoulder, leaving the center neckline stitches unworked.
Fasten off.
Rejoin yarn at the opposite shoulder and work the second shoulder.
The finished back should have enough width to support the shoulder straps without pulling toward the neck.
Shoulder Straps
The straps are intentionally simple so their length can be adjusted for the baby.
Join Color A at the outer edge of the front shoulder.
Strap
Ch 1.
Sc across the shoulder.
Turn.
Sc across.
Repeat until the strap measures approximately:
- 3 inches for 3 months
- 3½ inches for 6 months
- 4 inches for 12 months
Try the romper against the intended wearer before fastening off whenever possible.
If the strap needs to be longer, add additional rows.
Buttonhole or Snap Option
For baby garments, securely attached snaps are often more practical than decorative buttons.
If using a button instead, make the buttonhole near the end of the strap.
Buttonhole Row
Sc in the first 2 sts.
Ch 1, skip the next stitch.
Sc across the remaining stitches.
On the following row, work one sc into the chain space.
Fasten off.
For a snap closure, omit the buttonhole and sew the snap securely to the strap after finishing.
Joining the Shoulders
Place the front and back pieces with the wrong sides facing each other.
Align the shoulders carefully.
Use a tapestry needle and matching yarn to sew the shoulders together.
Alternatively, you can slip stitch the pieces together.
Keep the seam flexible rather than pulling it tightly.
Repeat for the second shoulder.
Joining the Sides
Align the front and back body pieces.
Starting at the underarm, sew down the side toward the lower body.
Repeat on the opposite side.
Leave the lower leg openings open.
This creates two separate leg openings rather than one large lower opening.
Lower Leg Edging
Join Color C around one leg opening.
Work one round of single crochet evenly around the opening.
Do not pull the edging too tightly.
Join with a slip stitch.
Fasten off.
Repeat around the second leg.
For a slightly decorative finish, work:
sc, ch 1, sc in the next stitch
around the edge.
Keep the edging loose enough that the baby’s leg can pass comfortably through the opening.
Crotch Closure
The lower crotch area should open sufficiently for easy diaper changes.
Place the romper flat and identify the center of the lower front and back sections.
Attach a row of securely sewn snaps along the opening.
Use enough snaps to prevent large gaps between them.
Check every snap before the garment is worn.
If you prefer a button closure, use small, securely sewn buttons and make sure there are no loose threads.
Finishing
Weave in all yarn ends on the inside of the romper.
Trim the tails only after they have been woven securely through several stitches.
Gently block the garment if needed.
For baby clothing, avoid aggressive blocking that could permanently stretch the fabric.
Wash according to the yarn manufacturer’s care instructions.
Ocean-Inspired Color Ideas
The classic version uses shades of blue and seafoam, but you can create several different ocean moods.
Tropical Water
- Turquoise
- Aqua
- Ivory
Deep Sea
- Navy
- Teal
- Silver gray
Beach Sunrise
- Coral
- Pale blue
- Sand
Sea Glass
- Sage
- Seafoam
- Cream
Classic Nautical
- Navy
- White
- Red
Making the Romper Longer
The easiest way to add length is to continue the wave stripe section before beginning the armhole shaping.
Add complete stripe repeats rather than adding random individual rows.
This keeps the color pattern balanced.
Remember that additional length will also increase yarn requirements.
Making a Wider Romper
For a custom width, adjust the starting chain while preserving the stitch repeat required by the wave pattern.
Always make a gauge swatch first.
Do not simply add several stitches to one side because the wave pattern relies on a repeating sequence.
When changing the width, make sure the total stitch count accommodates complete wave repeats.
Tips for a Neat Wave Pattern
Keep your tension consistent
Uneven tension can make the wave peaks appear taller on one side and flatter on the other.
Count after every repeat
The wave stitch contains both increases and decreases. A missed decrease can cause the following rows to become wider.
Change colors at the edge
Changing colors at the same side of the garment produces clean horizontal stripes.
Don’t pull the color-change yarn too tightly
Baby garments need flexibility. If carried yarn is pulled tightly, the side edge can pucker.
Measure the garment as you go
Age-based sizing is only a starting point. Baby proportions vary, so compare the project against actual measurements whenever possible. The Craft Yarn Council specifically recommends using body measurements when determining garment fit.
Common Mistakes
My waves aren’t lining up.
Check that each wave repeat contains the correct number of stitches.
The increases and decreases must balance.
The garment is getting wider.
A missed decrease is one of the most common causes.
Count the stitches at the end of every wave row.
The side seams are puckering.
Your edging or sewing tension may be too tight.
Loosen your stitches and avoid pulling the seams together excessively.
The neckline is too tight.
Add another row to the shoulder straps or slightly widen the neckline during shaping.
Always check the garment against the intended wearer before attaching the final closures.
Baby Safety
This romper is intended as a handmade baby garment and should be checked carefully before use.
- Securely fasten all snaps, buttons, and decorative elements.
- Check the garment regularly for loose components.
- Do not leave long yarn tails, cords, or unsecured ties inside the garment.
- Avoid small detachable decorations that could become choking hazards.
- Do not leave a baby unattended while wearing a handmade garment.
- Stop using the garment if any closure, seam, or decorative component becomes loose or damaged.
For sleepwear, follow applicable local requirements for children’s sleep garments rather than assuming a handmade romper is automatically suitable as sleepwear.
Frequently Asked Questions
What yarn is best for an Ocean Waves baby romper?
A soft DK-weight yarn with good stitch definition works well. Cotton and cotton-blend yarns are especially suitable for warm-weather garments, while washable acrylic can be another practical option.
What hook size should I use?
Start with a 4 mm (US G-6) crochet hook and adjust the size as necessary to achieve the stated gauge.
Is this baby romper suitable for beginners?
The basic stitches are beginner-friendly, but shaping the armholes, neckline, straps, and crotch closure makes the complete project more appropriate for an intermediate crocheter.
Can I make the romper in one color?
Yes. The wave texture remains visible without color changes.
For a minimalist romper, use one soft shade and let the ripple texture provide the visual interest.
Can I use cotton yarn?
Yes, provided the yarn produces the required gauge and has enough flexibility for a baby garment.
Keep in mind that different fibers behave differently after washing.
Can I make larger sizes?
Yes. The design can be adapted by maintaining the wave stitch repeat and adjusting the body width and length.
For larger sizes, measure a well-fitting romper and use those measurements as your target rather than scaling the baby sizes mathematically.
How do I wash the finished romper?
Follow the care instructions for your specific yarn.
If the romper will be given as a baby gift, include the yarn’s care instructions with the finished garment.
Why You’ll Love This Crochet Baby Romper
The Ocean Waves Baby Romper is a sweet combination of practical construction and ocean-inspired texture.
The ripple rows create movement without requiring complicated colorwork, while the three-color stripe sequence gives the garment a recognizable seaside look.
It is also easy to personalize. Change the palette, lengthen the body, add a contrasting edging, or use a single color for a completely different style.
Whether you’re crocheting it for a baby shower, summer photos, or a handmade everyday outfit, this ocean-inspired romper makes a thoughtful project for a little one.