Crochet Celtic Stripes Beanie Free Pattern
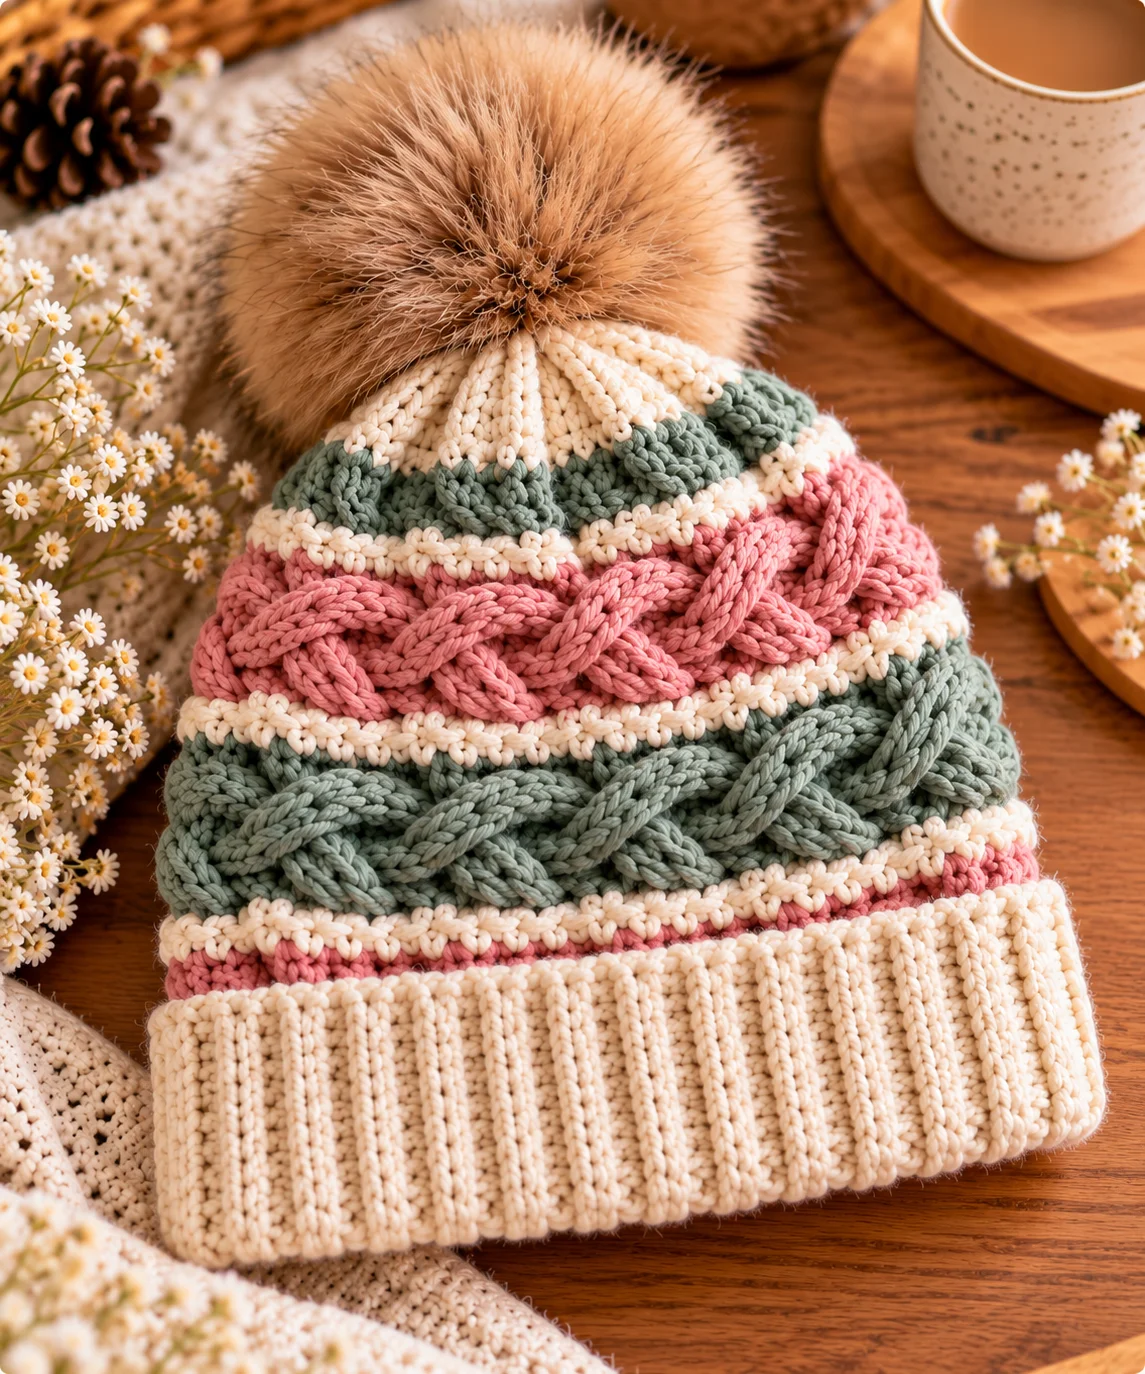
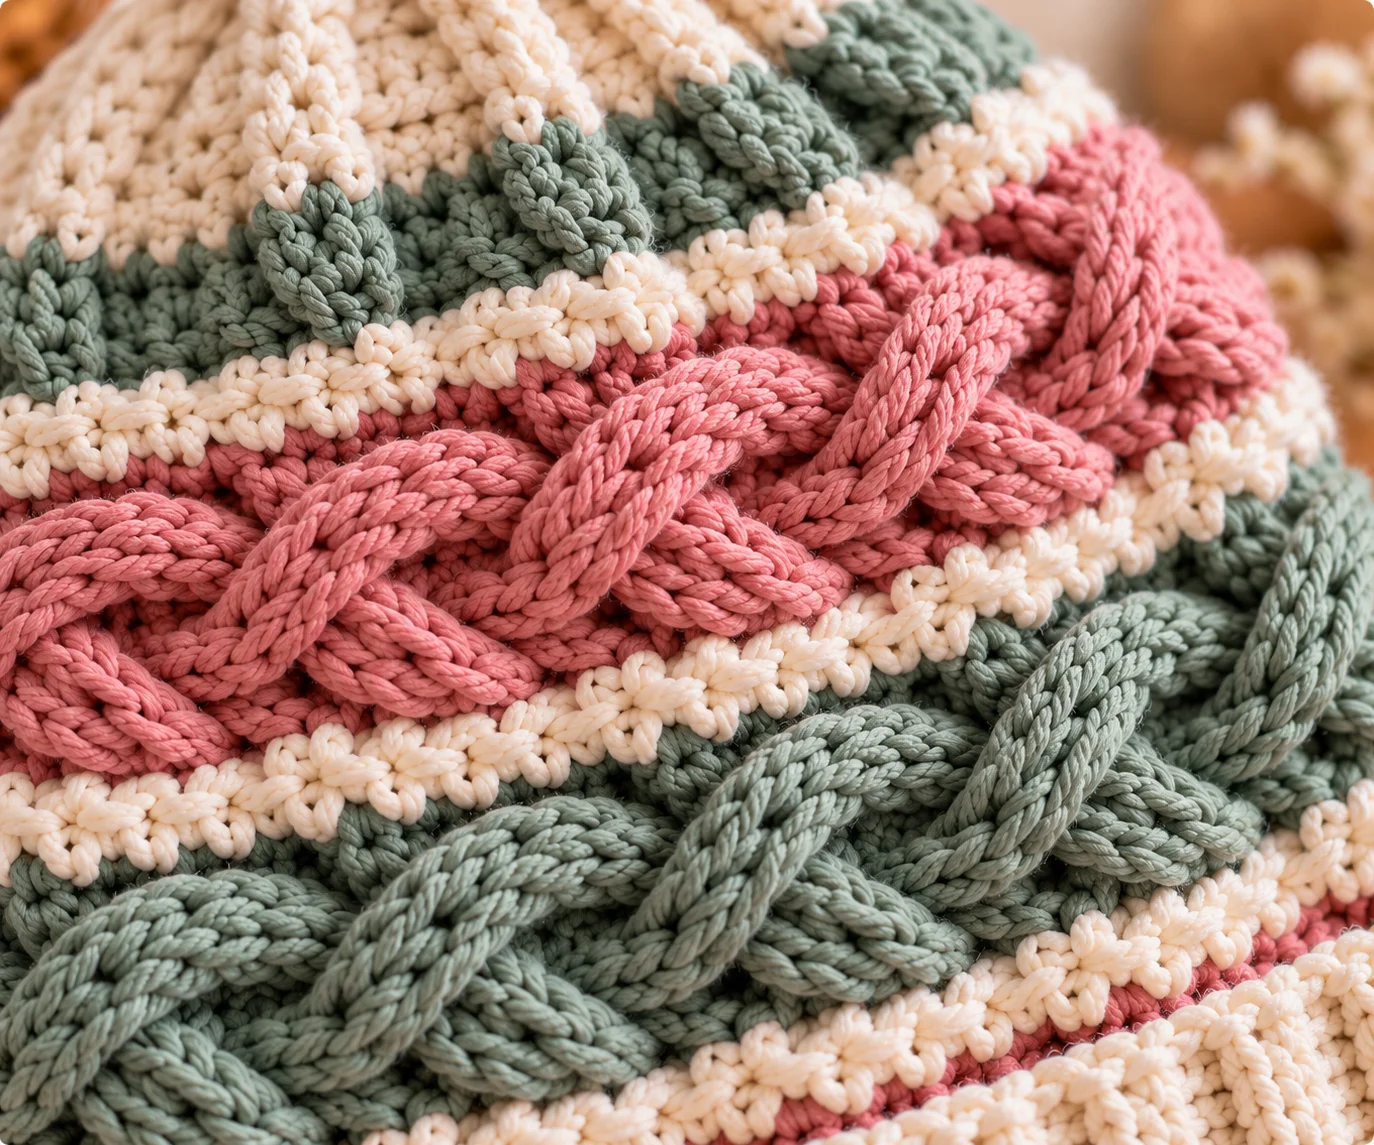
If you love textured crochet hats, this Celtic Stripes Beanie is a fun project to add to your handmade wardrobe. The design combines a stretchy ribbed brim with raised crossed cables that create a woven, Celtic-inspired effect.
Three coordinating yarn colors are worked in stripes to make the texture stand out. The cable sections look intricate, but they are created with familiar crochet stitches and a simple repeating sequence.
This original pattern is written in US crochet terminology and includes two adult sizes.
Crochet Celtic Stripes Beanie – Pattern Details
- Pattern type: Crochet beanie
- Skill level: Intermediate
- Construction: Brim-up
- Sizes: Adult Small/Medium and Adult Large/XL
- Yarn weight: #4 worsted weight
- Hook: 5 mm (US H-8), or size needed to obtain gauge
- Technique: Crossed front post stitches
- Colors: 3
- Terminology: US crochet terms
- Optional: Yarn or faux-fur pom-pom
The sizing is designed around standard adult head measurements. The Craft Yarn Council lists adult head circumferences of approximately 21–23 inches for women and 22–24 inches for men, so measuring the intended wearer is preferable to choosing a size by label alone.
Finished Measurements
| Size | Finished Hat Circumference | Approx. Hat Height |
|---|---|---|
| Adult Small/Medium | 20–20½ in | 9 in |
| Adult Large/XL | 22–22½ in | 9½ in |
The finished hat is intentionally smaller than the head circumference so the fabric can stretch for a comfortable fit.
Tip: Measure the head around the forehead and fullest part of the head.
Materials
Yarn
Use a #4 worsted-weight yarn with good stitch definition.
You will need approximately:
- Color A: 90–110 yards
- Color B: 45–60 yards
- Color C: 45–60 yards
Total yardage will vary according to size, yarn brand, tension, and whether you add a pom-pom.
For the clearest Celtic texture, choose yarn that is not extremely fuzzy. Smooth acrylic, wool, wool blends, and other worsted-weight yarns with good stitch definition work well.
Other Supplies
- 5 mm (US H-8) crochet hook
- Tapestry needle
- Scissors
- Stitch marker
- Optional pom-pom
Crochet Abbreviations
- ch — chain
- sc — single crochet
- sl st — slip stitch
- dc — double crochet
- FPdc — front post double crochet
- hdc — half double crochet
- hdc2tog — half double crochet 2 together
- BLO — back loop only
- sk — skip
- st/sts — stitch/stitches
- rep — repeat
All instructions use US crochet terminology.
Gauge
Work a small swatch in the main stitch pattern.
Approximately 14 sc = 4 inches across.
For height, aim for approximately 15 sc rounds = 4 inches.
Because the cable stitches can pull the fabric inward, measure your gauge without stretching the swatch excessively.
If your swatch is too large, change to a smaller hook. If it is too small, try a larger hook.
Special Stitch: Front Post Double Crochet
A front post double crochet is worked around the vertical post of the stitch instead of through the top loops.
To make an FPdc:
- Yarn over.
- Insert your hook from front to back and back to front around the post of the indicated stitch.
- Yarn over and pull up a loop.
- Yarn over and pull through 2 loops.
- Yarn over and pull through the remaining 2 loops.
Post stitches are commonly used to create raised crochet cables and textured fabric.
The Celtic Cross Stitch
The main texture uses a four-stitch cable.
Right-Cross Cable
Skip the next 2 stitches. Work FPdc around the next 2 stitches. Then work FPdc around the 2 skipped stitches, working in front of the two stitches just made.
This makes the first pair cross over the second pair.
Left-Cross Cable
Work the same four post stitches in the opposite visual direction by bringing the second pair across the front of the first pair.
The important part is consistency: once you establish the direction of your crossing, keep the post stitches grouped together.
Ribbed Brim
The brim is worked back and forth first, then joined into a ring.
Adult Small/Medium
With Color A, ch 11.
Row 1
Sc in the 2nd ch from hook and in each ch across. (10 sts)
Row 2
Ch 1, turn. Sc BLO across. (10 sts)
Row 3
Repeat Row 2.
Continue working Row 2 until the strip measures approximately 20 inches when gently stretched.
Do not fasten off.
Adult Large/XL
Follow the same instructions, but continue until the brim measures approximately 22 inches when gently stretched.
Join the Brim
Fold the strip so the first and last rows meet.
Slip stitch the two short ends together through both layers.
Fasten off Color A only if necessary to reposition your yarn. Otherwise, continue directly into the body.
Working the Body
For the body, you will work stitches evenly around the long edge of the ribbed band.
For the Small/Medium, work 72 sc around the edge.
For the Large/XL, work 84 sc around the edge.
The stitch count is deliberately a multiple of 12 because the Celtic texture uses a 12-stitch repeat.
Join with a sl st to the first sc.
Place a stitch marker to identify the beginning of each round.
Celtic Stripes Beanie Body
The body alternates plain rounds with crossed-cable rounds.
The three-color sequence is:
Color A → Color B → Color A → Color C
You can repeat this sequence or substitute your own colors.
Round 1 — Foundation Texture Round
With Color A:
Ch 1.
Sc in each stitch around.
Join with a sl st to the first sc.
72 (84) sts
Round 2 — Right-Cross Cable Round
With Color A:
*Sc in the next 4 sts.
Skip the next 2 sts.
FPdc around each of the next 2 sts.
Working in front of the two FPdc just made, FPdc around each of the 2 skipped sts.
Sc in the next 4 sts.*
Repeat from * around.
Join with a sl st.
72 (84) sts
The crossed stitches should form small raised twists across the front of the hat.
Round 3 — Plain Round
Ch 1.
Sc in each stitch around.
Join with a sl st.
72 (84) sts
Fasten off Color A.
Round 4 — Color B
Join Color B.
Ch 1.
Sc in each stitch around.
Join with a sl st.
72 (84) sts
Round 5 — Left-Cross Cable Round
Continue with Color B.
*Sc in the next 4 sts.
For the cable section, work the four FPdc so that the second pair crosses over the first pair in the opposite direction from Round 2.
Sc in the next 4 sts.*
Repeat from * around.
Join with a sl st.
72 (84) sts
Round 6
Ch 1.
Sc in each stitch around.
Join with a sl st.
72 (84) sts
Fasten off Color B.
Repeat the Celtic Stripe Sequence
Join Color A.
Repeat Rounds 2–3 once more.
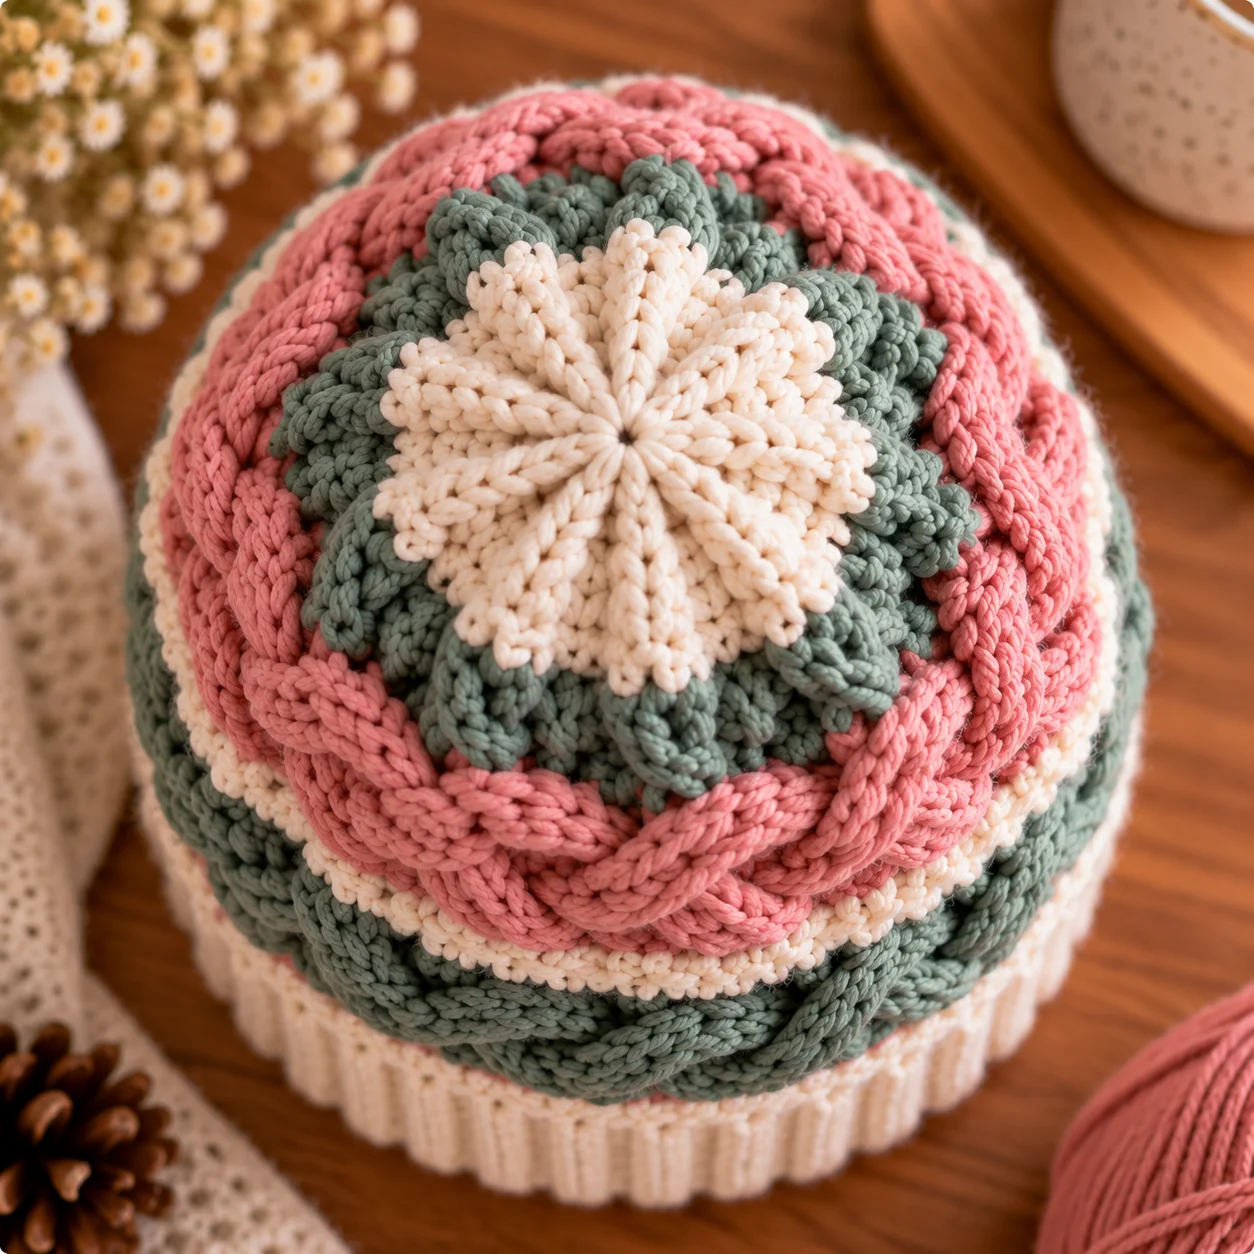
Fasten off Color A.
Join Color C.
Repeat Rounds 5–6 once more.
At this point you should have a series of raised crossed sections separated by narrow color bands.
For a shorter fitted hat, proceed to the crown after completing this sequence.
For a slightly deeper beanie, repeat the Color A and Color C sections one additional time.
Do not add or remove stitches during the body section.
The stitch count must remain:
- Small/Medium: 72 sts
- Large/XL: 84 sts
Crown Shaping
The crown is worked in half double crochet so the top closes gradually while maintaining a relatively smooth appearance.
Switch back to Color A.
Crown Round 1
Ch 1.
Hdc in the next 4 sts, hdc2tog.
Repeat from * around.
Small/Medium: 60 sts
Large/XL: 70 sts
Join with a sl st.
Crown Round 2
Ch 1.
Hdc in the next 3 sts, hdc2tog.
Repeat from * around.
Small/Medium: 48 sts
Large/XL: 56 sts
Join with a sl st.
Crown Round 3
Ch 1.
Hdc in the next 2 sts, hdc2tog.
Repeat from * around.
Small/Medium: 36 sts
Large/XL: 42 sts
Join with a sl st.
Crown Round 4
Ch 1.
Hdc in the next st, hdc2tog.
Repeat from * around.
Small/Medium: 24 sts
Large/XL: 28 sts
Join with a sl st.
Crown Round 5
Small/Medium
Ch 1.
Hdc2tog around.
12 sts
Large/XL
Ch 1.
Hdc2tog, hdc in the next 2 sts.
Repeat around.
21 sts
Join with a sl st.
Final Crown Round
Small/Medium
Hdc2tog around.
6 sts
Fasten off, leaving a long tail.
Large/XL
Hdc2tog around as evenly as possible until approximately 10–11 sts remain.
Fasten off, leaving a long tail.
Close the Crown
Thread the remaining yarn onto a tapestry needle.
Insert the needle through the front loop of each remaining stitch around the crown.
Pull gently to gather the opening closed.
Take several small securing stitches across the opening, then weave the yarn securely through the inside of the hat.
Trim the excess yarn.
Finishing the Beanie
Weave in all remaining ends with a tapestry needle.
Turn the hat right side out and gently arrange the crossed stitches so the Celtic texture is clearly visible.
Do not aggressively stretch the cable sections because excessive stretching can flatten the raised post stitches.
Optional Pom-Pom
A pom-pom is completely optional.
For a coordinated look, use Color A or combine all three colors.
Attach it securely to the crown through several stitches rather than relying on a single strand.
If the hat is intended for a young child, avoid detachable decorative pieces that could become a choking hazard.
How the Celtic Texture Is Created
The woven effect comes from crossing pairs of front post double crochet stitches.
Unlike ordinary crochet stitches, post stitches wrap around the body of a stitch. This pushes the new stitches toward the front of the fabric and creates raised columns.
Crossing one pair over another produces the cable-like appearance.
Alternating the crossing direction keeps the texture from looking like a simple row of identical cables.
The result is a compact woven motif that works particularly well for winter hats.
Color Ideas
The Celtic texture looks different depending on the color combination.
Traditional Autumn
- Deep forest green
- Rust
- Cream
Winter Neutrals
- Charcoal
- Oatmeal
- Soft gray
Jewel Tones
- Burgundy
- Emerald
- Mustard
High Contrast
- Black
- Ivory
- Cranberry
For a subtle look, choose three shades from the same color family.
For a bold striped beanie, use three colors with strong contrast.
How to Adjust the Size
The easiest way to customize this design is to adjust the circumference of the ribbed band before beginning the body.
Measure around the wearer’s head across the forehead and around the fullest part of the head.
The Craft Yarn Council recommends using the actual head measurement rather than relying solely on age or generic sizing charts.
Because this design uses a 12-stitch repeat, the body should contain a stitch count divisible by 12.
Examples include:
- 60 stitches
- 72 stitches
- 84 stitches
- 96 stitches
- 108 stitches
For a custom size, make the ribbed band to the desired circumference and then distribute the appropriate multiple of 12 stitches evenly around the long edge.
Tips for Perfect Celtic Cables
Keep the post stitches loose
Do not pull your FPdc stitches tightly. They need enough height and flexibility to cross over one another.
Use a smooth yarn
Highly textured or fuzzy yarn can hide the cable definition.
Count your repeats
Each Celtic repeat occupies 12 stitches.
For the Small/Medium size:
6 repeats × 12 stitches = 72 stitches
For the Large/XL size:
7 repeats × 12 stitches = 84 stitches
This makes it easier to locate a mistake.
Use a stitch marker
Because the hat is worked in rounds, a stitch marker makes it much easier to identify the beginning of each round.
Check the fit before closing the crown
Try the hat on once the body is tall enough. It is much easier to add another textured stripe before starting the crown decreases.
Common Mistakes
My cables look flat.
Check your tension. If the FPdc stitches are pulled too tightly, they may not stand out.
My stitch count keeps changing.
The cable stitches are still worked around existing stitch posts, so the crossed section should not increase or decrease the stitch count.
After every cable round, you should still have:
72 or 84 stitches.
My cable crosses in the wrong direction.
Pay attention to which pair is worked first and which pair is brought across the front. If the crossing looks opposite to the previous cable, that is intentional when working the alternating cable rounds.
My hat is too loose.
Check the circumference before finishing the crown. A crochet hat normally needs some negative ease so that it stretches around the head rather than hanging loosely.
My hat is too short.
Add another complete stripe section before beginning the crown shaping.
Can Beginners Make This Beanie?
This pattern is best suited to an intermediate crocheter.
You should be comfortable with:
- Single crochet
- Half double crochet
- Working in the round
- Working through the back loop
- Front post stitches
- Basic decreases
- Counting stitch repeats
The Celtic cable itself is repetitive once you understand how the crossed post stitches work.
If front post stitches are new to you, practice the four-stitch cable on a small swatch before beginning the hat.
Frequently Asked Questions
Is this Celtic Stripes Beanie pattern free?
Yes. This is an original free pattern designed around a Celtic-inspired crossed-post texture.
What yarn is best?
A smooth #4 worsted-weight yarn is recommended. Choose a yarn with enough stitch definition that the raised cables remain visible.
What hook size should I use?
Start with a 5 mm (US H-8) hook and adjust as necessary to obtain gauge.
Can I make the beanie in one color?
Yes. The Celtic cable texture works beautifully as a solid-color hat. Simply continue with Color A instead of changing colors.
Can I make it slouchy?
Yes. Add one or two additional complete body stripe sequences before beginning the crown.
Can I make the brim wider?
Yes. Increase the foundation chain for the ribbing. Remember that a wider brim will add height to the finished hat.
Can I sell finished hats made from this pattern?
Yes, you may sell finished physical items made from your own work. Do not redistribute this written pattern as your own or republish the complete instructions elsewhere.
Final Thoughts
This Crochet Celtic Stripes Beanie combines a classic winter-hat silhouette with raised crossed cables and bold color changes. The repeating 12-stitch motif makes the texture easier to keep track of, while the ribbed brim gives the finished hat a comfortable amount of stretch.
Try traditional greens and creams for a Celtic-inspired palette, or experiment with modern neutrals and jewel tones for a completely different look.
The most important part is to check your gauge, keep the post stitches relaxed, and count your cable repeats as you work.
Once you understand the crossing technique, the same Celtic-inspired texture can also be adapted for scarves, cowls, ear warmers, and other winter accessories.