Dinosaur Hooded Sweater Free Crochet Pattern
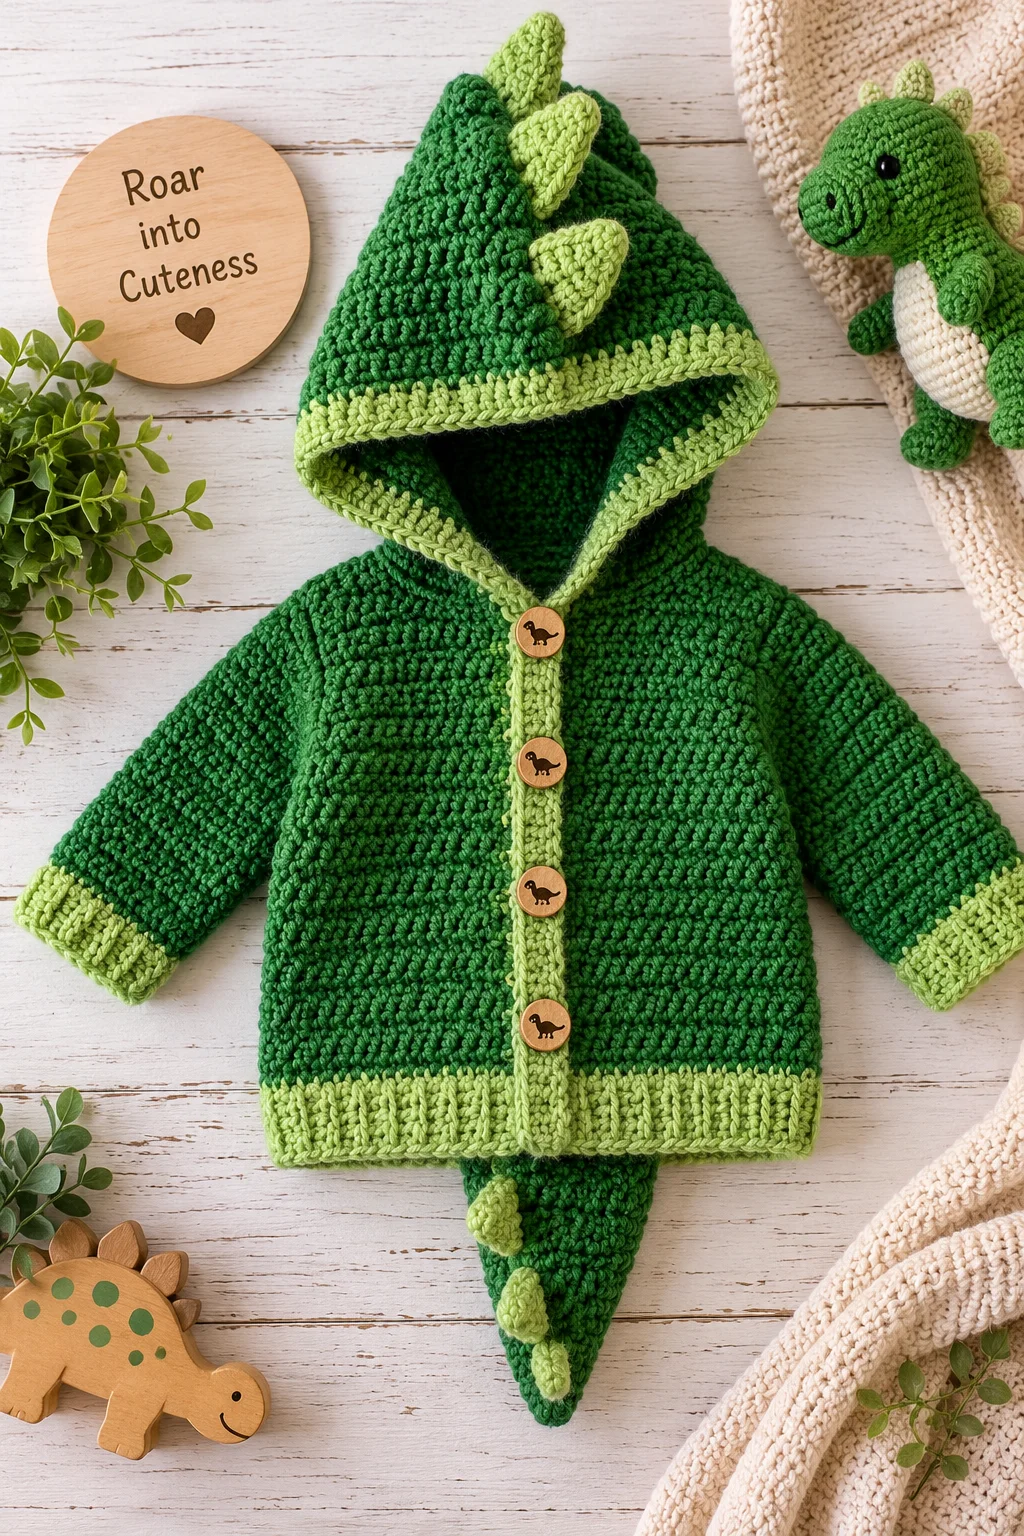
If you have a little dinosaur fan in your life, this Dinosaur Hooded Sweater with Spikes is a fun crochet project to add to your handmade wardrobe.
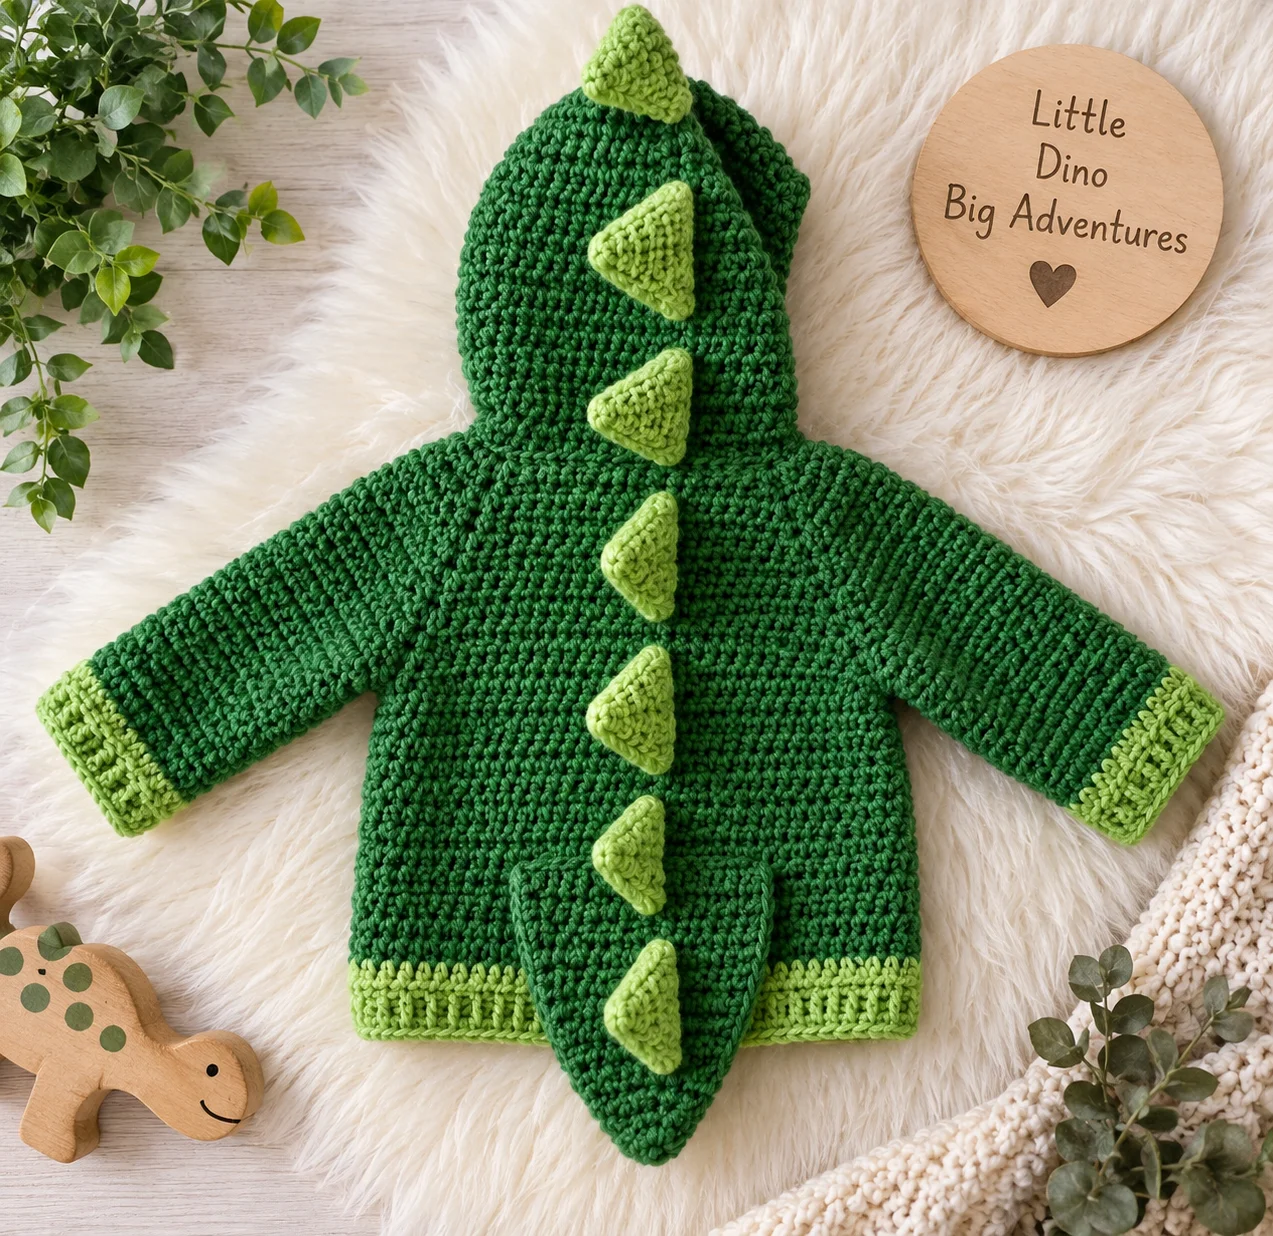
The sweater combines a simple pullover construction with a playful dinosaur hood and a row of crocheted spikes running from the hood down the back. You can make the sweater in classic dinosaur green or choose any color combination you like.
The basic sweater uses straightforward crochet stitches, while the hood and spikes add the special details that make the finished piece stand out.
This pattern uses US crochet terminology and is written as a flexible starting-size pattern. Because children’s sizing can vary, always compare the finished measurements with the intended child’s measurements before completing the garment.
Pattern note: The stitch counts and measurements below are an original draft and have not been professionally graded or tested. Make a gauge swatch and adjust the pattern as needed for the intended size.
Materials You’ll Need
- Worsted-weight yarn in green for the main sweater
- Small amount of lighter green or contrasting yarn for the spikes
- Small amount of black yarn for optional eyes
- Small amount of cream or white yarn for optional eye details
- 5.0 mm (H-8) crochet hook
- 4.5 mm crochet hook, optional, for edging
- Scissors
- Tapestry needle
- Stitch markers
- Measuring tape
- Stitch pins or locking markers
Optional
- Fiberfill, if making stuffed decorative eyes
- Embroidery needle
For children’s clothing, choose a soft, washable yarn that feels comfortable against the skin.
Yarn & Hook Information
Recommended Yarn
A soft worsted-weight yarn works well for this sweater because it provides enough structure for the hood and spikes without making the garment excessively heavy.
Acrylic is an easy-care option, while cotton blends can produce a lighter sweater.
Suggested color combination
For a classic dinosaur:
- Main color: medium green
- Spike color: light green
- Eyes: black and white
You can also make the entire sweater in one color and use a contrasting shade only for the spikes.
Hook Size
Start with a 5.0 mm (H-8) hook.
If your fabric is very tight, move up to a larger hook.
If it is too loose, try a smaller hook.
Gauge
Approximately:
14 hdc × 12 rows = 4 inches
Gauge is important because this is a garment. A difference in tension can significantly change the finished size.
Finished Size
This draft is designed around an approximately 2–3 year child size.
Approximate measurements:
- Chest circumference: 22–24 inches
- Body length: 14–15 inches
- Sleeve length: 12 inches
- Hood height: approximately 10 inches
Use the child’s actual measurements whenever possible.
Crochet Terms & Abbreviations
US crochet terminology is used.
- ch — chain
- sc — single crochet
- hdc — half double crochet
- dc — double crochet
- sl st — slip stitch
- st — stitch
- sts — stitches
- dec — decrease
- BLO — back loop only
- FO — fasten off
Special Stitch: Hdc2tog
Hdc2tog: Yarn over, insert hook into the next stitch and pull up a loop. Yarn over, insert hook into the following stitch and pull up a loop. Yarn over and pull through all loops on the hook.
This creates a half double crochet decrease.
Before You Start
This sweater is made from:
- Front panel
- Back panel
- Sleeves
- Hood
- Dinosaur spikes
- Optional facial details
The front and back are worked separately and sewn together at the shoulders and sides.
The sleeves are worked from the armholes.
The hood is worked from the neckline and then seamed at the top.
The spikes are crocheted separately and sewn along the hood and back.
Important sizing tip
Before starting, measure:
- Chest circumference
- Shoulder width
- Desired sweater length
- Sleeve length
- Head circumference
Compare these measurements with the finished garment as you work.
How to Crochet the Dinosaur Hooded Sweater
Step 1: Crochet the Front Panel
With the main green yarn, chain 43.
Row 1: Hdc in the 2nd chain from hook and across.
42 sts
Rows 2–30: Ch 1, turn, hdc across.
Fasten off.
The front panel should measure approximately 14–15 inches long.
Optional dinosaur belly
For a contrasting belly panel, replace the green yarn with a lighter color for approximately the lower 10–12 rows.
Alternatively, sew a separate oval-shaped belly patch onto the front after the sweater is finished.
Step 2: Crochet the Back Panel
Repeat the front panel.
With green yarn:
Chain 43.
Rows 1–30: Ch 1, turn, hdc across.
Fasten off.
The front and back should be the same width and approximately the same length.
Step 3: Join the Shoulders
Place the front and back panels together with the right sides facing outward.
Sew the shoulder seams together.
Leave an opening in the center for the neckline.
For a small child’s sweater, an opening of approximately 7–8 inches is a useful starting point.
Adjust the neckline based on the child’s actual head measurement.
Step 4: Join the Sides
Starting at the bottom edge, sew the front and back together.
Stop approximately 5–6 inches below the shoulder to create each armhole.
Repeat on the other side.
Try the sweater on if possible or compare the opening with a well-fitting sweater.
Step 5: Crochet the Sleeves
Attach green yarn around one armhole.
Work hdc evenly around the opening.
Join with a slip stitch.
Sleeve Round 1
Ch 1, hdc around. Sl st to the first hdc.
Sleeve Round 2
Ch 1, hdc in each stitch around. Sl st to the first hdc.
Continue working rounds until the sleeve reaches approximately 12 inches or your desired length.
Taper the sleeve
Every few rounds, work a decrease round if the sleeve needs to become narrower toward the wrist.
For example:
Decrease Round: Ch 1, *hdc in next 5 sts, hdc2tog; repeat from * around.
Continue with regular rounds between decrease rounds.
Don’t decrease too aggressively. Children need comfortable movement through the arms.
Step 6: Add the Sleeve Cuffs
For a simple cuff:
Round 1: Ch 1, sc around. Sl st to first sc.
Round 2: Ch 1, sc BLO around. Sl st to first sc.
Repeat Round 2 for 2–3 rounds.
Fasten off.
Repeat for the second sleeve.
Step 7: Crochet the Hood
Attach green yarn to the back neckline.
Work evenly around the neckline using hdc.
Hood Round 1
Ch 1, hdc around the neckline. Sl st to the first hdc.
Hood Rounds 2–12
Ch 1, hdc in each stitch around. Sl st to the first hdc.
Continue until the hood reaches approximately 9–10 inches high.
Try the hood on the intended wearer if possible.
It should provide enough room around the head without being excessively loose.
Step 8: Shape the Top of the Hood
Flatten the hood so the center back is aligned.
Sew the top opening closed using a tapestry needle and matching yarn.
For a rounded hood, gently shape the seam as you sew.
Weave in the yarn ends securely.
Step 9: Make the Dinosaur Spikes
Now for the fun part!
Make approximately 12–16 spikes, depending on the size of the sweater.
You can make them all the same size or gradually increase their size toward the middle of the back.
Use the contrasting spike color.
Small Spike
Row 1: Ch 5, sc across.
4 sts
Row 2: Ch 1, turn, sc across.
4 sts
Row 3: Ch 1, turn, sc2tog twice.
2 sts
Row 4: Ch 1, turn, sc2tog.
1 st
Fasten off.
This creates a simple triangular spike.
Make several small spikes.
Step 10: Make Larger Spikes
For larger spikes:
Row 1: Ch 7, sc across.
6 sts
Rows 2–3: Ch 1, turn, sc across.
Row 4: Ch 1, turn, sc2tog, sc across to last 2 sts, sc2tog.
Continue decreasing toward the top until one stitch remains.
Fasten off.
Make several larger spikes.
Step 11: Arrange the Spikes
Lay the sweater flat.
Starting at the top of the hood, arrange the spikes down the center back.
A fun arrangement is:
- Small spike near the forehead
- Medium spikes around the top and back of the hood
- Larger spikes down the back
- Gradually smaller spikes toward the lower back
Pin them in place before sewing.
This makes it much easier to adjust the spacing.
Step 12: Sew on the Spikes
Using matching yarn and a tapestry needle, sew each spike securely along its bottom edge.
Make several passes through the base of each spike.
Check each attachment carefully before the garment is worn.
For children’s clothing, decorative pieces should be securely attached and regularly inspected.
Step 13: Add Dinosaur Eyes
There are two easy options.
Embroidered eyes
Use black yarn to embroider two small eyes near the front of the hood.
Add a tiny white stitch for a highlight if desired.
Crocheted eyes
Make small circles using black and white yarn and sew them securely to the hood.
For very young children, embroidered details are preferable to loose or detachable pieces.
Step 14: Add Optional Dinosaur Teeth
For a playful open-mouth look, use cream or white yarn to embroider a few small triangular teeth along the hood opening.
Keep the teeth simple and securely stitched.
You can also skip this detail for a more subtle dinosaur design.
Step 15: Finish the Hood Edge
Work one round of single crochet around the hood opening.
For a slightly firmer edge, work another round of sc.
Don’t crochet the edging too tightly.
The hood should remain comfortable around the child’s face.
Step 16: Weave in the Ends
Use a tapestry needle to weave all loose yarn ends into the wrong side of the sweater.
Secure each end through several stitches before trimming.
Pay particular attention to the spike attachments and hood seams.
Tips & Troubleshooting
Why is my sweater too small?
Check your gauge first.
If your stitches are smaller than the pattern gauge, the entire sweater will come out smaller.
Try a larger hook and make another swatch.
Why is my sweater too wide?
Your tension may be looser than expected.
Measure your gauge and adjust your hook size.
You can also reduce the starting chain for a smaller size.
My hood is too tight. What should I do?
The neckline opening may be too small.
Remove the hood edging and check the opening against the child’s head measurement.
If necessary, undo a portion of the neckline and enlarge it before continuing.
My hood looks too pointy.
Try adding a few more rounds before closing the top.
You can also gently shape the hood seam while sewing.
How do I keep the spikes standing up?
The spikes should have a firm base and enough height.
If they flop too much, use a slightly smaller hook or add a second crocheted layer to each spike.
Sew the bottom edge securely while leaving the upper point free.
My spikes are uneven.
That’s completely fine for a handmade dinosaur sweater!
If you want a more uniform look, make all the spikes using the same number of starting chains and rows.
The sweater feels stiff.
Try a larger hook or a softer yarn.
Crocheting with very tight tension can make garments uncomfortable.
Yarn Substitutions
Acrylic
Acrylic is a practical option for children’s sweaters because it is widely available and generally easy to care for.
Cotton
Cotton can make a breathable sweater, but it may stretch differently from acrylic.
A cotton blend can provide a little more flexibility.
Wool
Wool creates a warm sweater with natural elasticity.
However, check the care requirements carefully because some wool yarns need gentle washing.
Different yarn weights
You can make the design with DK or bulky yarn, but the finished measurements will change.
Changing yarn weight affects:
- Stitch count
- Hook size
- Finished width
- Finished length
- Warmth
- Drape
- Amount of yarn needed
For a predictable result, use the same yarn weight throughout the garment.
Customization Ideas
Try different dinosaur colors
Green isn’t required!
Try:
- Blue with light blue spikes
- Purple with pink spikes
- Gray with dark gray spikes
- Brown with cream spikes
- Yellow with orange spikes
Make rainbow spikes
Use a different color for each spike.
This is especially fun for children’s sweaters.
Add a dinosaur belly
Crochet or embroider a large oval belly patch in cream, yellow, or a lighter shade of the main color.
Add a tail
A small crocheted tail can be attached to the back of the sweater.
Make it flat rather than heavily stuffed and sew it securely.
Make the spikes larger
For a dramatic dinosaur look, increase the starting chain and add additional decrease rows.
Make a matching hat
Use the same green yarn to create a dinosaur hat with small crocheted spikes.
This makes a fun matching set.
Care Instructions
Follow the care instructions for the yarn you choose.
Many acrylic yarns can be machine washed, but the yarn label should always be the final authority.
For wool, gentle washing may be required.
Cotton may change shape after washing, so laying the garment flat to dry can help maintain its shape.
Inspect decorative spikes, eyes, and other attachments regularly.
Frequently Asked Questions
What age is this dinosaur sweater designed for?
The draft is approximately based on a 2–3 year child size. Always compare the finished measurements with the intended child’s measurements because children’s sizing varies.
Can I make this dinosaur sweater larger?
Yes. Increase the width of the front and back panels and add additional rows for body length and sleeve length.
Make sure the hood and armholes are adjusted proportionally.
Can I make the spikes a different color?
Absolutely. Contrasting spikes are one of the easiest ways to customize the sweater.
Can I make the sweater without a hood?
Yes. Simply finish the neckline with one or two rounds of single crochet instead of making the hood.
How many dinosaur spikes should I make?
For this approximate size, 12–16 spikes is a good starting point. The exact number depends on the width of the sweater and how closely you space them.
Can I use bulky yarn?
Yes, but you’ll need to adjust the hook size and stitch count. Bulky yarn will create a thicker and warmer sweater and will also change the finished dimensions.
Are crocheted eyes safe for babies?
For very young children, embroidered eyes are generally a safer design choice than small sewn-on pieces. Any decorative component should be securely attached and checked regularly.
Final Thoughts
This Dinosaur Hooded Sweater with Spikes is a fun project for little dinosaur lovers and a great opportunity to play with color.
The basic sweater is simple enough to customize, while the hood, spikes, and optional dinosaur face transform an ordinary pullover into something much more playful.
You can make the spikes subtle or dramatic, use classic green or bright rainbow colors, and adjust the sweater length to create a completely different look.
Remember to check your gauge and compare the finished measurements with a well-fitting garment whenever possible. Handmade clothing doesn’t have to be perfectly uniform to be special.
If you make your own dinosaur sweater, we’d love to see it! Leave a question in the comments, share your finished project, tag @BornCrochet on Instagram, and use #BornCrochet.