Orange Citrus Bat Amigurumi Free Crochet Pattern
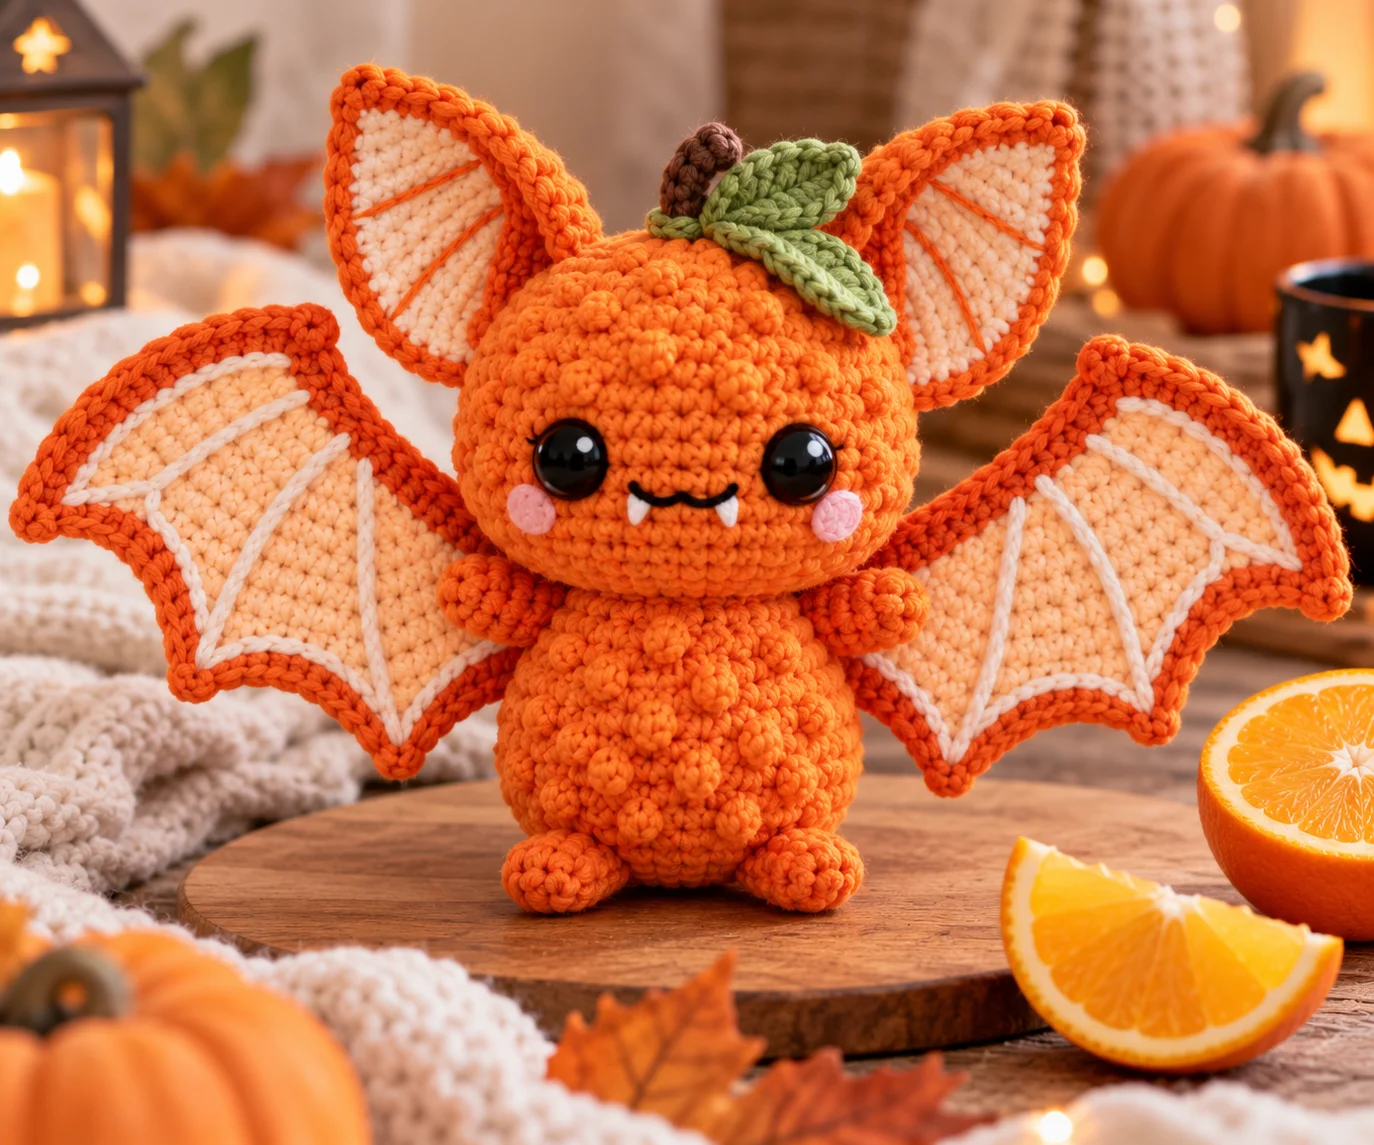
Looking for a crochet project that combines Halloween charm with a little fruity fun? An orange citrus bat amigurumi is an adorable choice for fall decorating, gifting, or adding a playful touch to a crochet collection.
This unusual design combines the recognizable shape of a bat with the colors and details of a juicy orange. The body uses textured crochet to suggest orange peel, while the wings are designed to resemble citrus slices. Green leaves complete the fruit-inspired look.
A free orange citrus bat pattern published by Crochet With Mia describes an intermediate project worked primarily with single crochet, bobble stitches, increases, decreases, and separate wing and leaf pieces. The published finished size is approximately 7 inches tall and 12 inches wide with the wings extended.
Pattern note: The exact stitch-by-stitch instructions belong to the original designer. This article provides an original project guide, construction overview, technique help, and pattern-planning information rather than reproducing another designer’s complete pattern.
Orange Citrus Bat Project Overview
This project is best suited to crocheters who already have some amigurumi experience.
The original free pattern uses:
- A worsted-weight yarn palette
- A 4 mm crochet hook
- Single crochet
- Bobble stitches
- Invisible decreases
- Continuous rounds
- Flat crocheted wings
- Embroidered wing details
- Separate ears, limbs, and leaves
- Safety eyes
- Polyester fiberfill
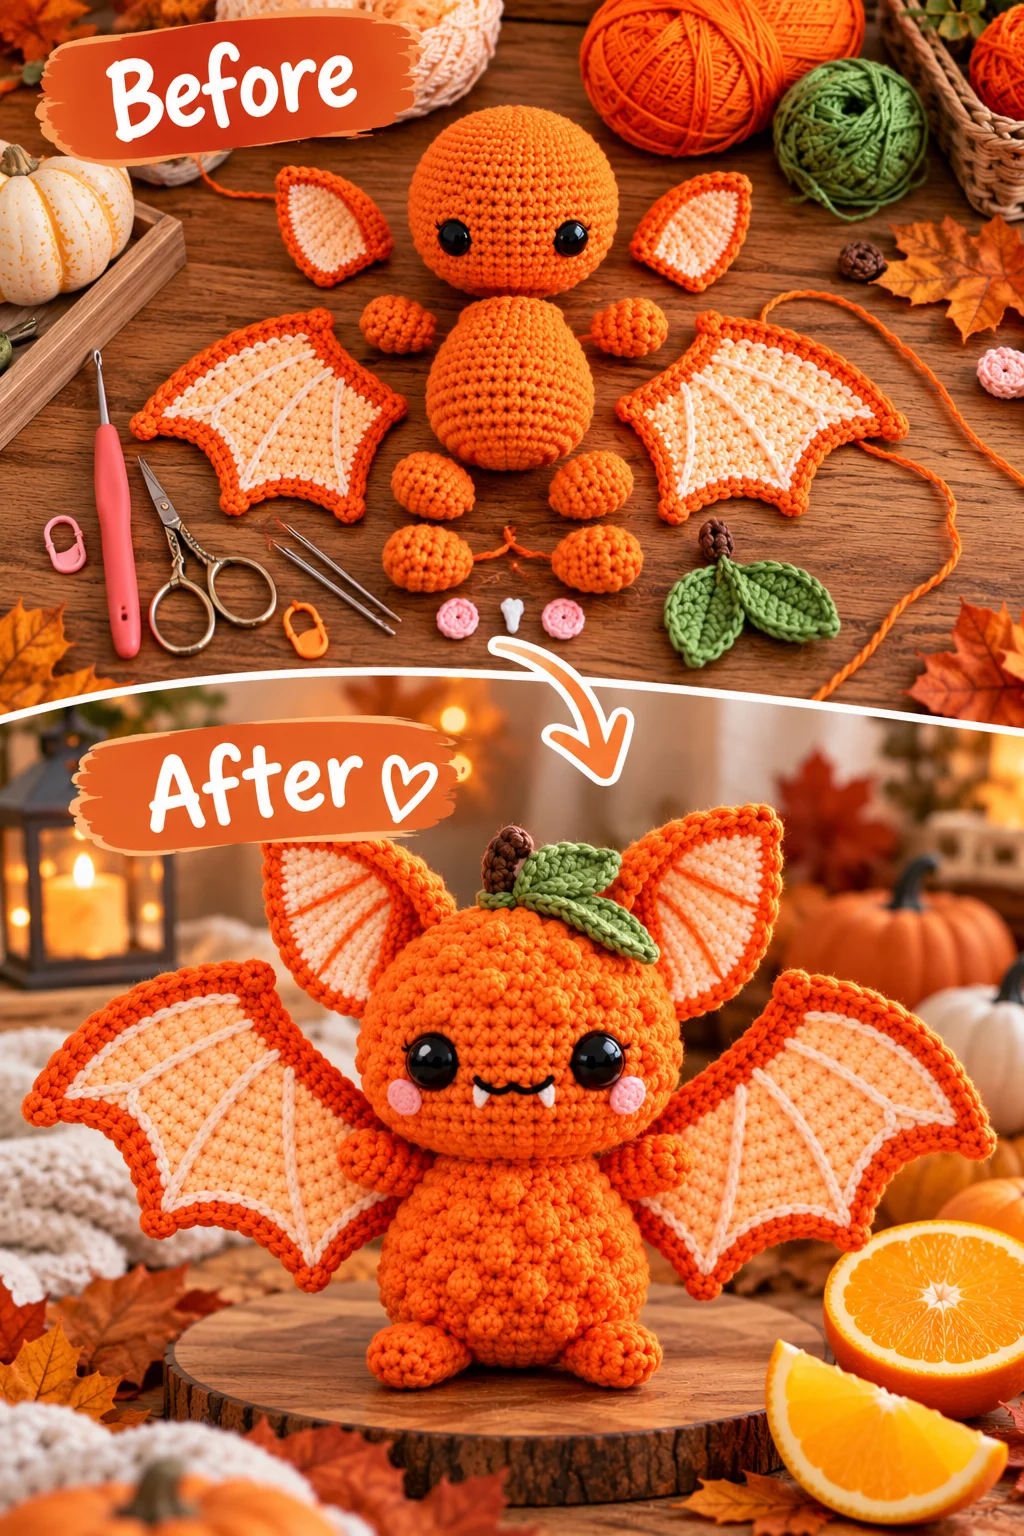
The body and head are worked as a connected piece, reducing the amount of sewing required for the main portion of the bat. The wings, ears, arms, legs, and decorative leaves are made separately and attached during finishing.
The result is a distinctly autumnal amigurumi that works especially well for Halloween displays.
Materials
For a project based on the original free pattern, you will need approximately:
- Worsted-weight orange yarn for the main body
- Darker orange yarn for the wing edging
- Pale peach or cream yarn for the wing interiors
- Green yarn for the leaves
- A small amount of white or off-white yarn for wing embroidery
- US G-6/4 mm crochet hook
- 12 mm black safety eyes
- Polyester fiberfill
- Yarn needle
- Scissors
- Stitch markers
The original designer specifies approximately 120 yards of the main orange, 60 yards of the darker orange, 50 yards of the light wing color, 20 yards of green, and a small amount of embroidery yarn.
If you substitute yarn, choose a smooth yarn with good stitch definition. This is particularly important because the bobble texture is one of the defining features of the design.
Crochet Abbreviations
The pattern uses standard US crochet terminology.
- ch – chain
- sc – single crochet
- sl st – slip stitch
- inc – increase
- dec – decrease
- MR – magic ring
- BLO – back loop only
- st/sts – stitch/stitches
- rnd – round
- RS – right side
- WS – wrong side
- sk – skip
- sp – space
- yo – yarn over
- pm – place marker
- Bob – bobble stitch
Gauge
The original free pattern lists a gauge of approximately 5 single crochet stitches and 5 rows per inch using the specified yarn and 4 mm hook.
For amigurumi, gauge is somewhat different from gauge for garments. You generally want firm fabric with very little stuffing showing through the stitches.
If your stitches are loose, try a smaller hook rather than deliberately crocheting loosely. A smaller hook also helps create a denser fabric that holds fiberfill securely.
Finished Size
Following the original designer’s specifications, the finished bat measures approximately:
- 7 inches tall
- 12 inches wide with the wings extended
The body itself is approximately 5 inches tall.
Your finished measurements may vary depending on yarn, hook size, stuffing pressure, and individual tension.
How the Orange Citrus Bat Is Constructed
Rather than thinking of this as one complicated project, break it into several manageable sections.
1. Head and Body
The head and body are crocheted as one continuous piece.
The project begins at the top with a magic ring and expands through strategically placed increases. Once the head reaches the desired width, decreases shape it inward toward the neck.
The body then expands again before gradually narrowing toward the bottom.
This construction gives the bat a rounded head and plump body without requiring a separate seam between the two.
2. Bobble Texture
The bobble stitches are what give the body its orange-peel appearance.
The original pattern uses a small multi-yarn-over bobble rather than simply adding surface embroidery. The raised stitches stand away from the fabric and create a bumpy texture across portions of the body.
When working amigurumi bobbles:
- Keep your working tension consistent.
- Complete all portions of the bobble in the indicated stitch.
- Close the bobble securely.
- Push the completed bump toward the outside of the work if necessary.
- Continue crocheting without accidentally skipping the stitch containing the bobble.
A common mistake is to lose track of the bobble’s stitch count. Remember that a completed bobble occupies one stitch unless the pattern specifically says otherwise.
3. Ears
Two small crocheted ears are made separately.
They are worked in rounds, then flattened rather than stuffed. Flattening the pieces gives the ears the thin, pointed appearance associated with a bat.
When sewing them to the head, angle them slightly outward instead of positioning them perfectly vertically. This creates a more expressive silhouette.
4. Arms
The arms are small tubular pieces worked in the main orange color.
They do not need to be heavily stuffed. Overstuffing narrow amigurumi limbs can make them rigid and difficult to position.
Leave a sufficiently long yarn tail for sewing each arm securely to the body.
5. Legs and Feet
The legs begin with a rounded foot section before narrowing into the leg.
Light stuffing helps the pieces maintain their shape while allowing the feet to sit naturally against the body.
Position the feet symmetrically and check the bat from the front before sewing them permanently.
6. Citrus-Inspired Wings
The wings are the most distinctive part of this design.
Instead of traditional dark bat wings, the wings use light citrus colors and embroidered details that suggest the segments of an orange.
The original pattern constructs each wing as a flat crocheted panel, followed by a contrasting border. The finished panels are attached to the sides of the body.
This construction is particularly useful because flat wings are easier to shape and embroider than heavily stuffed three-dimensional pieces.
Wing Embroidery
Once the wing panels are finished, use a yarn needle and contrasting yarn to add radiating lines.
Think of an orange cut in half: the lines should spread outward from the inner portion of the wing toward the curved edge.
Keep the embroidery slightly loose. Pulling the yarn too tightly can cause the wing fabric to pucker.
Small decorative stitches near the outer edge can also suggest citrus pulp.
7. Leaves
The leafy details are an important part of the fruit theme.
The original design uses three green leaves: one at the top of the head and one at each outer wing area.
Flatten or gently shape each leaf before attaching it. A slight curve makes the leaves look more natural than perfectly flat pieces.
Assembly
Assembly is where the orange bat really begins to take shape.
Attach the Ears
Place one ear on each upper side of the head. Check their height and angle from the front before sewing.
Add the Head Leaf
Attach the small stem and green leaf at the top of the head, positioned between or slightly behind the ears.
Sew on the Legs
Position the legs evenly along the lower portion of the body. Make sure both feet point in approximately the same direction.
Attach the Arms
Sew the arms onto the upper sides of the body. Slightly outward-facing arms create a cute, relaxed pose.
Attach the Wings
The wings should be securely sewn along their inner edges to the sides of the body.
Pin them first and look at the bat from the front, back, and side. This makes it much easier to correct an uneven wing placement before stitching.
Add the Wing Leaves
Finish the fruit-inspired look by attaching a green leaf to the outer portion of each wing.
Finishing
Weave in all loose yarn tails securely.
Because this is an amigurumi project that may be handled frequently, avoid leaving short ends that could work their way loose. Thread the tails through several stitches before trimming.
If the wings need shaping, gently dampen them and pin them flat until dry. Avoid excessive moisture or heat, especially when working with synthetic yarn.
The original designer also mentions optional stiffening materials for the wings when additional structure is desired.
Tips for Better Amigurumi Results
Keep Your Stitches Tight
Loose stitches can leave visible gaps between stitches and allow stuffing to show through.
Use a Stitch Marker
Continuous rounds can be difficult to count. Place a marker in the first stitch of each round and move it upward as you work.
Stuff Gradually
Do not wait until the final few rounds to add all the stuffing. Add small amounts as the opening becomes smaller.
The goal is a firm but squeezable body rather than a rock-hard one.
Check Symmetry Before Sewing
Before attaching the limbs and wings permanently, use pins to position everything.
Look at the project from several angles.
This simple step can prevent one wing from sitting noticeably higher than the other.
Protect the Bobble Texture
Avoid fuzzy yarn if you want the orange-peel texture to remain clearly visible. Smooth worsted-weight yarn provides much better stitch definition.
Customization Ideas
There are plenty of ways to turn the basic orange bat concept into your own seasonal character.
Make a Blood Orange Bat
Replace bright orange with deep red-orange yarn and use a darker burgundy shade for the wing border.
Make a Mandarin Bat
Use a lighter orange and pale cream for the wing sections for a softer fruit-inspired look.
Try a Lemon Bat
Change the orange palette to yellow and cream and replace the leaves with a slightly darker green.
Create a Halloween Palette
For a more traditional Halloween appearance, use orange for the body, black or charcoal for the wings, and green for the leaves.
Change the Facial Expression
The placement of the safety eyes has a major effect on the finished character. Slightly wider spacing can create a more innocent expression, while closer placement can make the bat look more mischievous.
Safety Considerations
If this amigurumi is intended for a young child, take extra care with small components.
Safety eyes are not automatically safe for babies or toddlers because they can become choking hazards if they are pulled out. For toys intended for very young children, embroidered facial features are generally preferable to detachable plastic components.
The finished toy should also be inspected regularly for loose stitching, detached pieces, exposed stuffing, or damaged components.
For a decorative adult or older-child project, safety eyes can be used according to the manufacturer’s instructions.
Frequently Asked Questions
Is this orange citrus bat crochet pattern beginner-friendly?
It is better suited to an intermediate crocheter. The design combines continuous-round amigurumi, bobble stitches, shaping, flat wing construction, embroidery, and sewing.
What crochet hook size is used?
The original free pattern specifies a US G-6/4 mm crochet hook with worsted-weight yarn.
How big is the finished bat?
The original design is approximately 7 inches tall and 12 inches wide when the wings are fully extended.
Do the wings need stuffing?
No. The wings are designed as flat panels rather than stuffed three-dimensional pieces. Optional stiffening can be used if you want them to hold their shape more firmly.
Can I use a different yarn?
Yes, but changing yarn weight will affect the finished size and fabric density. If you substitute yarn, choose a hook that produces a firm amigurumi fabric and expect the final dimensions to change.
Is there another orange bat pattern available?
Yes. There are other fruit-bat designs available online. For example, Ravelry currently lists an Orange Bat pattern by wyshinecrochet using chenille yarn and a 5 mm hook, with a finished size of approximately 9.25 × 7.3 inches. That pattern is a paid design rather than the free pattern discussed here.
There is also a separate Citrus Fruit Bats design by Woven Faerie Tales featuring lemon, lime, orange, and grapefruit variations; it is an intermediate paid pattern.
Where to Find the Free Pattern
For the complete stitch-by-stitch instructions, refer to the original designer’s Orange Citrus Bat Amigurumi Free Crochet Pattern by Crochet With Mia.
Using the original source is the best way to ensure you have the designer’s complete instructions, current corrections, and any accompanying photographs.
Conclusion
An orange citrus bat is a fun twist on traditional Halloween crochet. The combination of a plump orange-colored body, textured bobbles, citrus-slice wings, and little green leaves gives this amigurumi plenty of personality.
Although the project involves several intermediate techniques, breaking it into the body, limbs, wings, and decorative leaves makes it much more manageable. Take your time with the bobbles and, especially, the wing placement. Those details make the finished bat look polished and dimensional.
Whether displayed with your Halloween decorations or crocheted as part of a colorful fruit-animal collection, this citrus-inspired bat is an unusual seasonal project with plenty of charm.