Potted Flower Baby Free Amigurumi Crochet Pattern
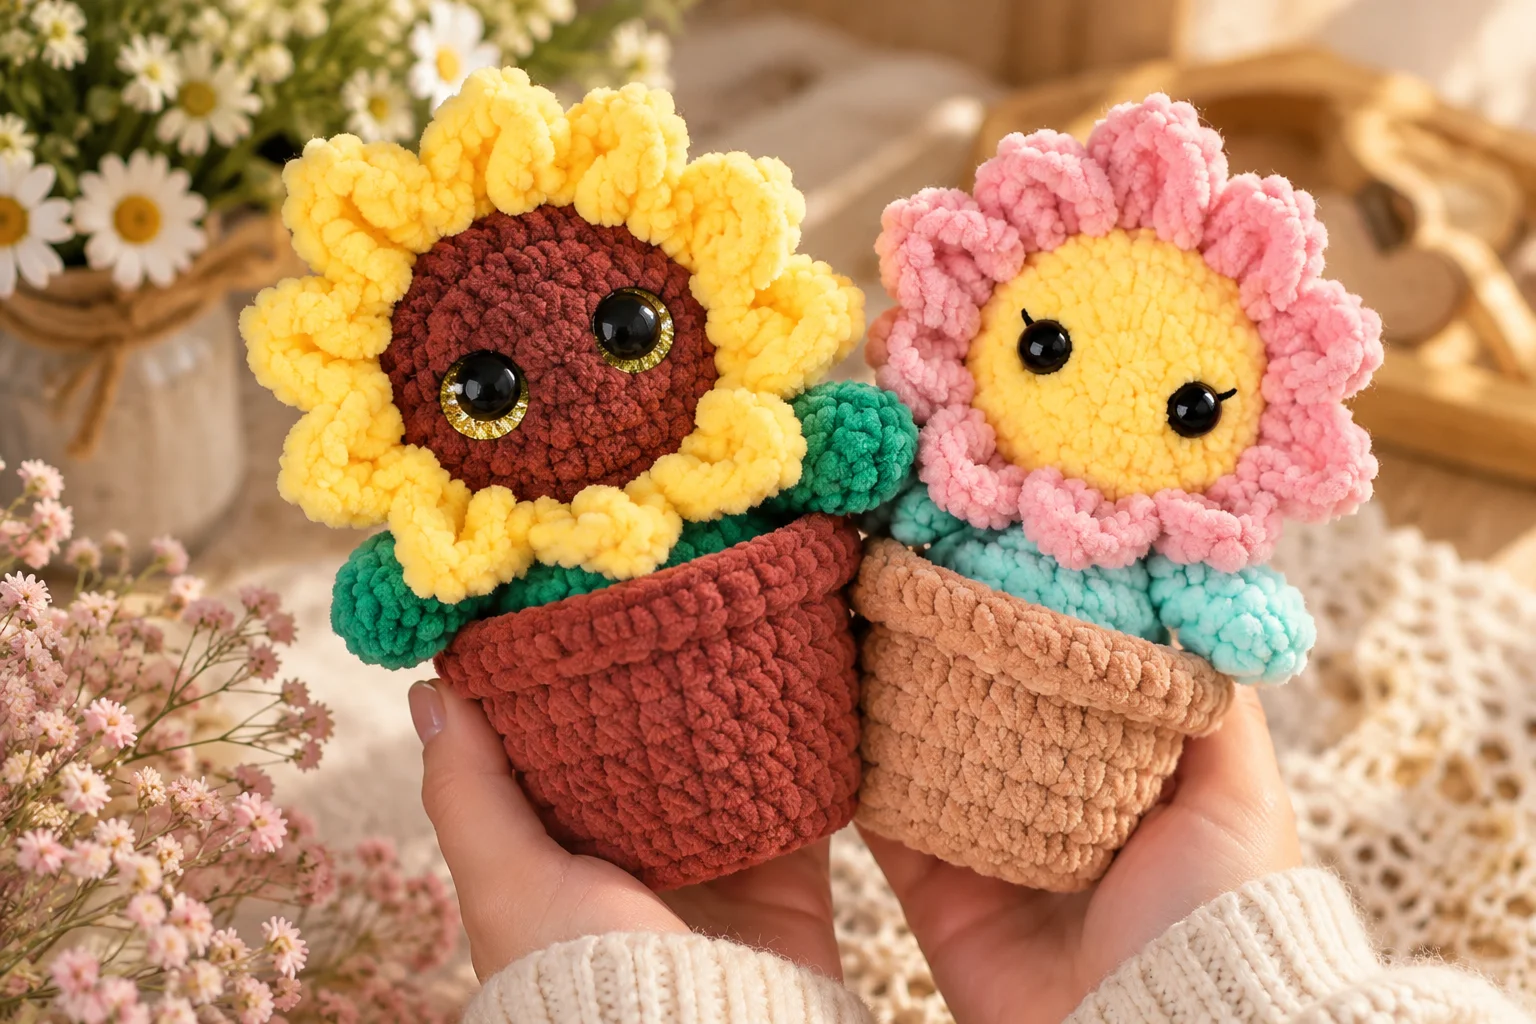
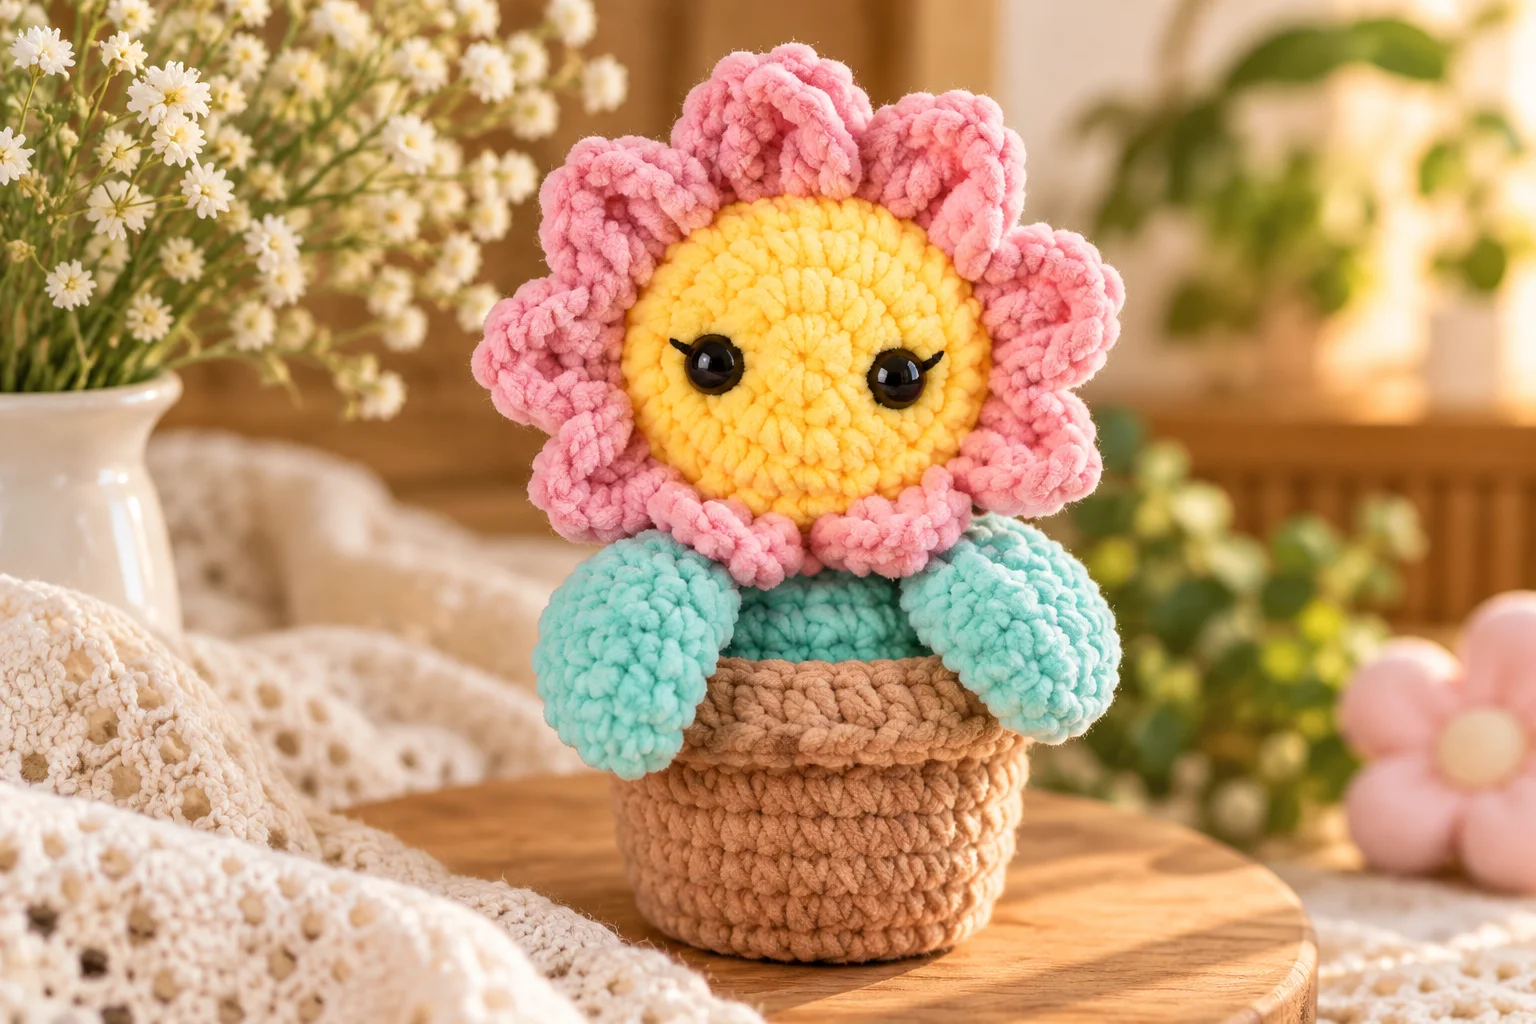
Bring a little garden magic to your crochet collection with this adorable Potted Flower Baby amigurumi! This sweet little character combines a tiny flower pot with a cheerful baby-like flower figure, creating a fun handmade decoration that is perfect for spring, nurseries, desks, shelves, and gifts.
The project uses basic amigurumi techniques and simple shaping. The flower baby’s head sits above a small crocheted pot, while the colorful petals and tiny leaves complete the garden-inspired design.
You can make your Potted Flower Baby in any color combination you like. Try soft pastels for a nursery decoration, bright colors for a cheerful spring project, or earthy shades for a cozy handmade home accessory.
Potted Flower Baby at a Glance
- Skill level: Intermediate beginner
- Project type: Amigurumi
- Yarn: Worsted-weight (#4)
- Hook: 3.5 mm (E-4)
- Construction: Crocheted in separate pieces
- Main stitch: Single crochet
- Technique: Worked in continuous rounds
- Finished size: Approximately 5–6 inches tall
- Terminology: US crochet terms
Materials
You will need:
- Worsted-weight yarn in your main flower color
- Small amount of green yarn
- Small amount of brown or terracotta-colored yarn
- Small amount of cream or pink yarn for the face, if desired
- 3.5 mm crochet hook
- Fiberfill stuffing
- Yarn needle
- Scissors
- Stitch marker
- Black embroidery thread for the face
You can substitute yarn weights, but remember that changing the yarn and hook will change the finished size.
Crochet Abbreviations
- MR – magic ring
- ch – chain
- sc – single crochet
- sl st – slip stitch
- inc – increase
- dec – decrease
- st/sts – stitch/stitches
- BLO – back loop only
Amigurumi Tips Before You Begin
This project is worked in continuous rounds, so you don’t join at the end of each round unless specifically instructed.
Use a stitch marker to identify the first stitch of every round.
Keep your stitches fairly tight. Amigurumi should have a dense fabric so the stuffing does not show through the stitches.
Add stuffing gradually rather than waiting until the final round. This makes it much easier to create a smooth shape.
Potted Flower Baby Crochet Pattern
The finished character consists of:
- Flower baby head
- Flower petals
- Green leaves
- Flower pot
- Optional arms
- Embroidered facial features
Make each component separately before assembling the character.
Flower Baby Head
Use your chosen skin or flower color.
Round 1
Make a magic ring.
Work 6 sc into the ring.
(6 sts)
Round 2
Inc in each stitch around.
(12 sts)
Round 3
Sc in the next stitch, inc in the next stitch.
Repeat around.
(18 sts)
Round 4
Sc in the next 2 stitches, inc in the next stitch.
Repeat around.
(24 sts)
Round 5
Sc in the next 3 stitches, inc in the next stitch.
Repeat around.
(30 sts)
Rounds 6–10
Sc in each stitch around.
(30 sts)
Begin adding stuffing as the head takes shape.
Round 11
Sc in the next 3 stitches, dec.
Repeat around.
(24 sts)
Round 12
Sc in the next 2 stitches, dec.
Repeat around.
(18 sts)
Add more stuffing and shape the head gently.
Round 13
Sc in the next stitch, dec.
Repeat around.
(12 sts)
Round 14
Dec around.
(6 sts)
Fasten off.
Use a yarn needle to close the remaining opening.
Weave in the yarn end.
Embroider the Face
Before attaching the head to the flower and pot, embroider the facial features.
Use black embroidery thread for the eyes.
Small embroidered eyes work particularly well for an amigurumi character.
You can add:
- Closed sleepy eyes
- Small round eyes
- A tiny smile
- Rosy cheeks
For a baby-inspired appearance, keep the facial details simple and soft.
Crochet Flower Petals
The flower petals surround the head.
Use a contrasting flower color.
Make 5 petals.
For each petal:
Petal
Chain 3.
Work 2 dc into the third chain from the hook.
Chain 2.
Slip stitch into the same chain space.
Fasten off, leaving a sewing tail.
Repeat until you have five petals.
Arrange the petals evenly around the back or sides of the flower baby’s head.
Sew each petal securely into place.
Make Fuller Petals
For a larger flower, add additional petals around the head.
Six or seven petals can create a fuller flower shape.
Keep the petals evenly spaced so the flower remains symmetrical.
Crochet Leaves
Use green yarn.
Leaf
Chain 7.
Starting in the second chain from the hook:
- Sc in the next stitch
- Hdc in the next stitch
- Dc in the next 2 stitches
- Hdc in the next stitch
- Sc in the final stitch
Continue along the opposite side of the chain.
Slip stitch to the beginning.
Fasten off, leaving a sewing tail.
Make two leaves.
Flower Pot
Use terracotta, brown, beige, or your favorite pot color.
Round 1
Make a magic ring.
Work 6 sc into the ring.
(6 sts)
Round 2
Inc around.
(12 sts)
Round 3
Sc in the next stitch, inc.
Repeat around.
(18 sts)
Round 4
Sc in the next 2 stitches, inc.
Repeat around.
(24 sts)
Round 5
Working in the back loop only, sc around.
(24 sts)
The BLO round creates a small ridge that separates the base of the pot from its upper section.
Rounds 6–9
Sc around.
(24 sts)
Begin stuffing the pot lightly.
Round 10
Sc in the next 2 stitches, dec.
Repeat around.
(18 sts)
Round 11
Sc around.
(18 sts)
Do not overstuff the pot. It should remain stable enough to support the flower.
Pot Rim
The rim gives the flower pot a finished appearance.
Round 12
Working in the front loop only, work 2 sc in each stitch around.
(36 sts)
Round 13
Sc around.
(36 sts)
Fasten off.
Weave in the yarn end.
Shape the rim gently with your fingers.
Optional Soil Detail
For a cute garden-inspired appearance, crochet a small circle in dark brown yarn.
Make a magic ring and work:
- 6 sc in Round 1
- 12 sc in Round 2
- 18 sc in Round 3
Fasten off.
Place the brown circle inside the top of the pot.
This creates the appearance of soil around the base of the flower.
Optional Baby Arms
For a more character-like flower baby, add two tiny arms.
Use the same yarn color as the head.
Round 1
Make a magic ring.
Work 6 sc into the ring.
Rounds 2–4
Sc around.
Fasten off and leave a sewing tail.
Make two arms.
Do not overstuff these small pieces.
Sew the arms to the sides of the flower baby just above the pot.
Assembly
Now it’s time to put your little flower baby together.
Step 1: Attach the Petals
Arrange the petals around the head.
Sew them securely into position.
Step 2: Attach the Leaves
Place the leaves behind the flower, slightly below the head.
Sew them firmly into place.
Step 3: Attach the Head
Position the bottom of the head over the opening of the flower pot.
Sew the head securely to the top of the pot.
Use several stitches around the connection point so the head does not wobble excessively.
Step 4: Add the Arms
If you made arms, position one on each side.
Sew them securely.
Step 5: Add the Soil
Place the optional brown soil circle inside the pot.
Sew or stitch it into place if necessary.
Easy Color Combinations
Classic Garden Flower
- Pink petals
- Green leaves
- Terracotta pot
- Soft peach face
Sunflower Baby
- Golden yellow petals
- Green leaves
- Brown pot
- Warm cream face
Pastel Nursery
- Lavender petals
- Sage leaves
- Cream pot
- Pale pink face
Rainbow Flower
Make each petal a different bright color for a cheerful rainbow flower baby.
Customization Ideas
Add a Tiny Bow
Crochet a small bow and attach it to one side of the flower.
Add a Smile
Embroider a tiny curved smile beneath the eyes.
Make a Sleeping Flower Baby
Use closed embroidered eyes for a peaceful sleeping expression.
Add a Scarf
A tiny crochet scarf around the flower baby’s neck can make the character perfect for cooler-season decorations.
Change the Pot
Instead of terracotta, try a striped, speckled, or pastel flower pot.
Amigurumi Tips
Keep Your Stitches Tight
Loose stitches can allow the stuffing to show.
If your stitches are too loose, try a smaller crochet hook.
Stuff Gradually
Add small amounts of stuffing as you work.
This helps you control the shape and prevents lumps.
Avoid Overstuffing
Too much stuffing can stretch the crochet fabric and distort the shape.
Use a Stitch Marker
Continuous rounds can be difficult to track.
A stitch marker at the beginning of each round will help you maintain accurate stitch counts.
Common Mistakes to Avoid
Using a hook that is too large:
This can create visible gaps in the amigurumi fabric.
Overstuffing the head:
A firmly stuffed head is good, but excessive stuffing can make the stitches stretch.
Uneven petal placement:
Arrange all petals before sewing them permanently.
Attaching the head loosely:
The head should be securely sewn to the pot.
Leaving yarn tails exposed:
Weave all ends into the inside of the project for a neat finish.
Safety Note
This crochet amigurumi is intended as a decorative handmade item.
If making it for a baby or young child, avoid plastic safety eyes, buttons, beads, or other small detachable pieces. Embroidered facial features are a safer option for items intended for very young children, but handmade toys and decorations should still be inspected regularly for loose parts or damaged stitching.
Frequently Asked Questions
How big is the finished Potted Flower Baby?
Using worsted-weight yarn and a 3.5 mm hook, the finished piece should be approximately 5–6 inches tall, although the final size will vary with tension and yarn choice.
Is this amigurumi beginner-friendly?
It is suitable for a crocheter who is comfortable with basic single crochet, increases, decreases, stuffing, and sewing pieces together.
Can I use cotton yarn?
Yes. Cotton can produce excellent stitch definition and a slightly firmer amigurumi.
Can I make a larger flower baby?
Yes. Use thicker yarn and a larger hook for a larger finished character. You can also enlarge the individual pieces by adding additional increase rounds.
Can I make the flower a different color?
Absolutely. The flower can be pink, yellow, purple, blue, white, orange, or any combination you like.
Can I leave out the arms?
Yes. The arms are completely optional. The character looks cute with or without them.
Final Thoughts
This Potted Flower Baby free amigurumi crochet pattern is a fun little project for anyone who loves cute crochet characters and colorful flowers. The combination of a tiny flower pot, cheerful petals, leaves, and an embroidered face creates a unique handmade decoration.
Make one flower baby or create an entire little crochet garden using different flower colors and pot designs. They are small enough to display almost anywhere and make charming handmade gifts for spring, birthdays, nurseries, or anyone who loves whimsical crochet.