Crochet Bear Lovey Free Pattern
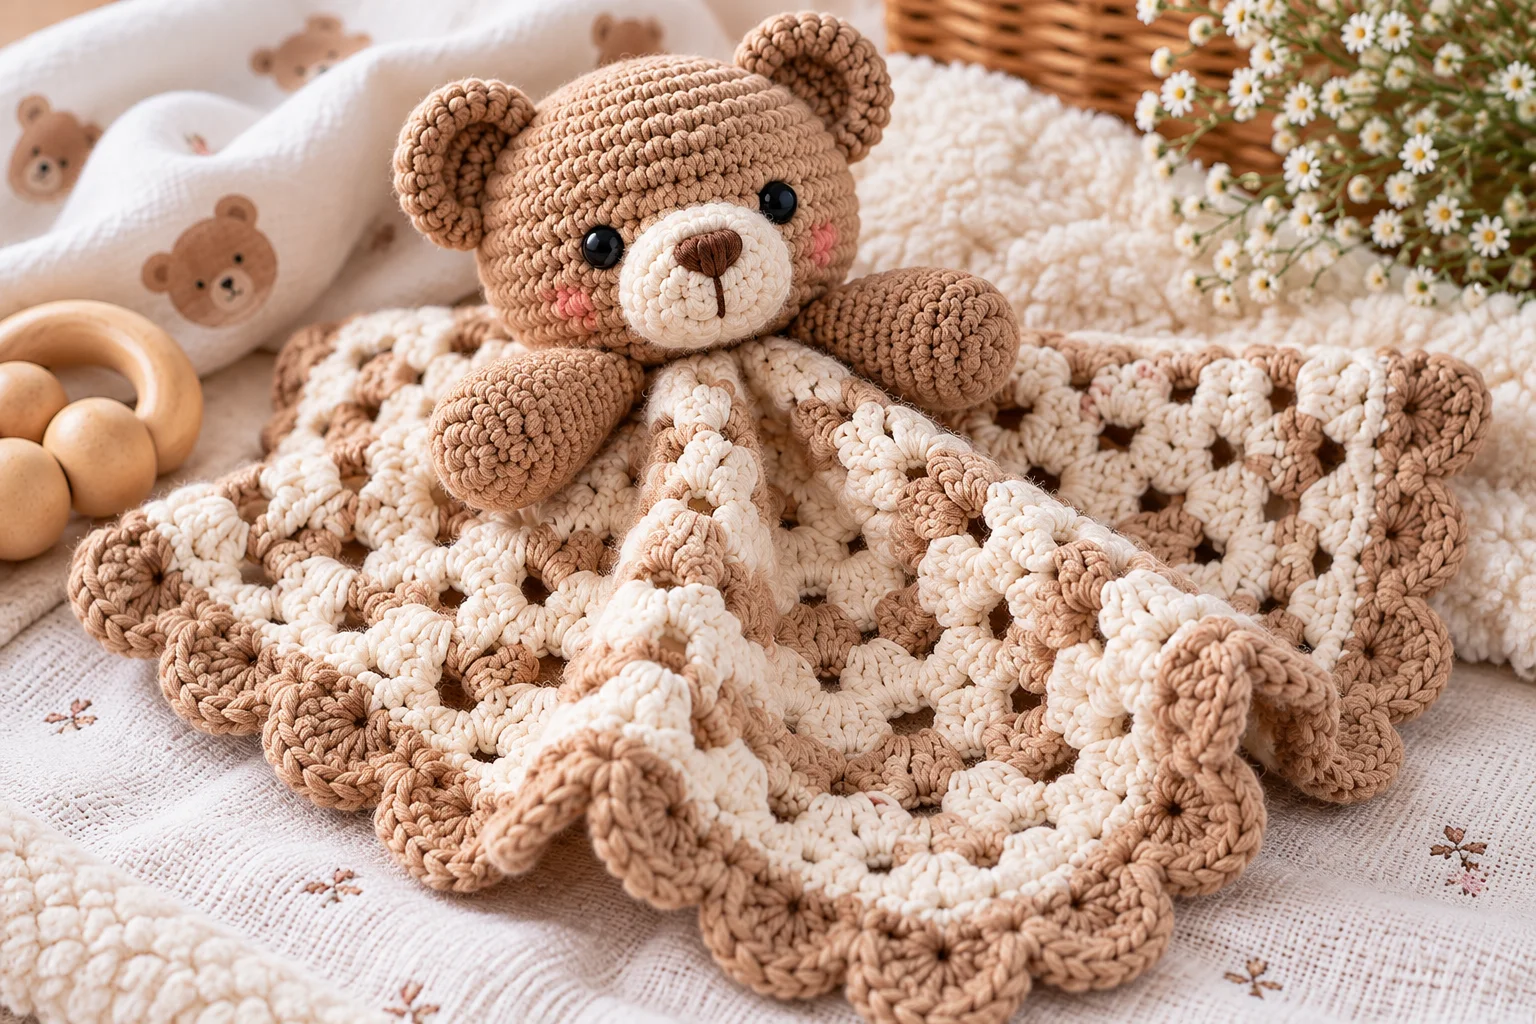
Looking for a sweet handmade baby gift that is both cuddly and adorable? This Crochet Bear Lovey combines a soft little bear head with a simple crochet blanket, creating a comforting security blanket that’s perfect for baby showers, newborn gifts, and nursery keepsakes.
The bear head is made with basic crochet stitches, while the blanket uses an easy repeating stitch pattern. You can make the lovey in classic teddy-bear brown, creamy ivory, soft beige, or any color that matches your favorite nursery palette.
This is an original beginner-friendly crochet pattern using US crochet terminology.
Crochet Bear Lovey Pattern Details
- Skill level: Easy to intermediate
- Crochet terminology: US terms
- Project type: Baby lovey/security blanket
- Yarn weight: DK or light worsted weight
- Hook: 3.5 mm (E-4) for the bear and 4 mm (G-6) for the blanket
- Approximate finished size: 15–16 inches across
- Construction: Crochet blanket with a separately made bear head
- Main stitches: Single crochet, half double crochet, and double crochet
- Colors: Bear color, blanket color, and small amounts of black/dark brown and pink
Materials
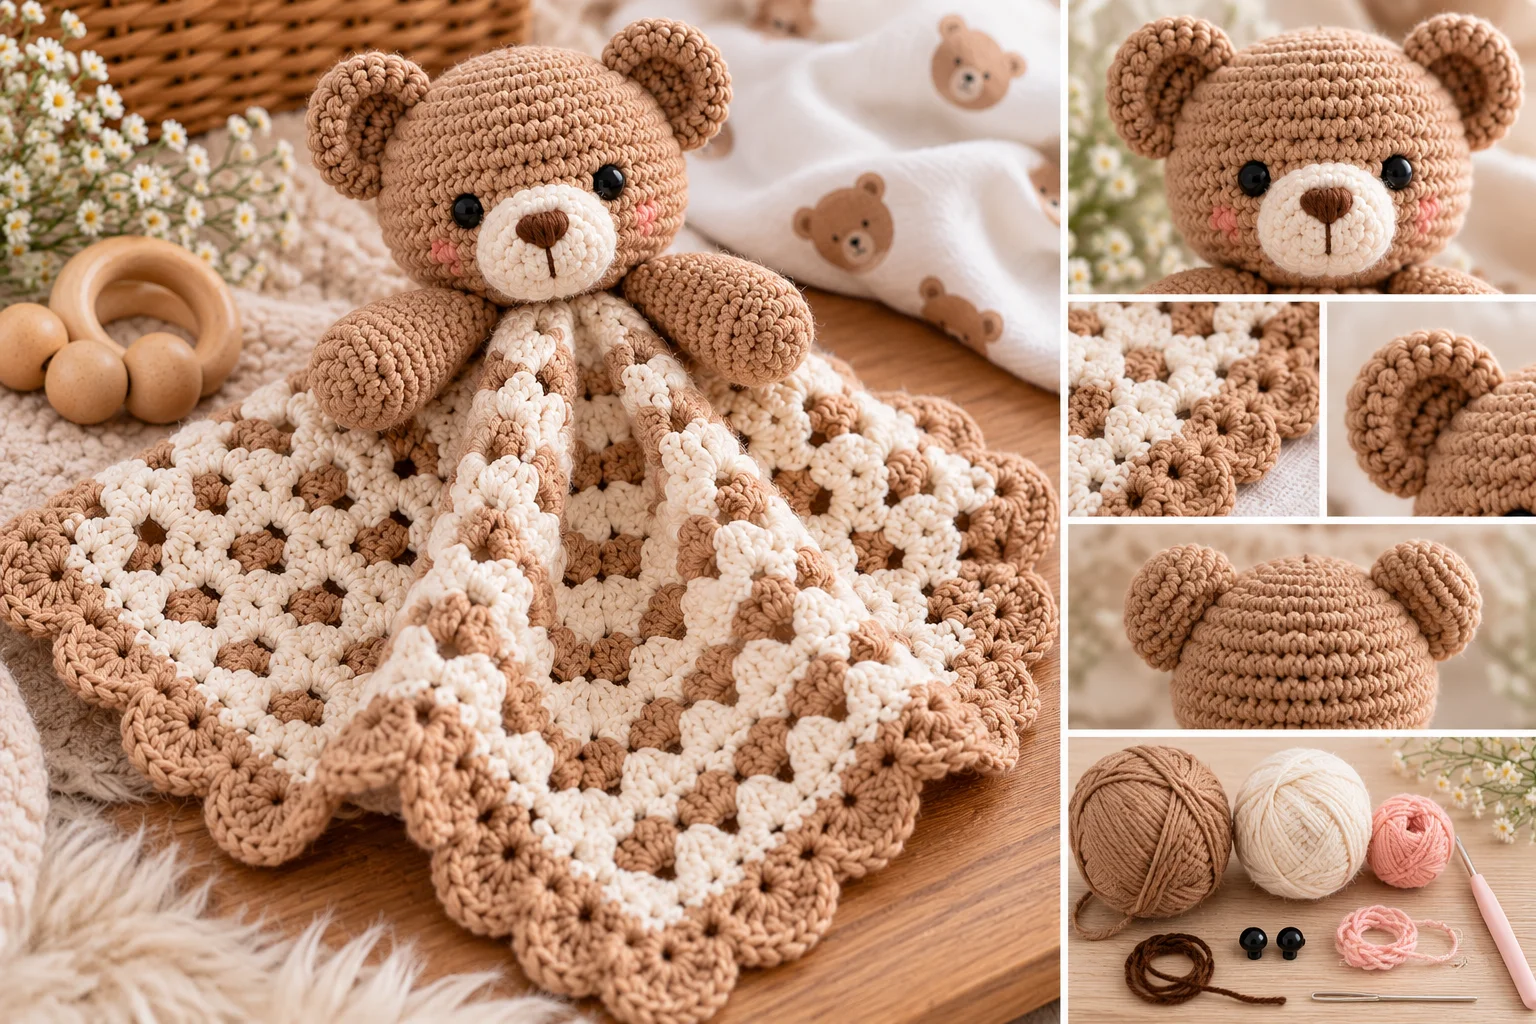
You will need:
- Approximately 150–200 yards of soft, washable yarn for the blanket
- Approximately 50 yards of yarn for the bear head
- Small amount of contrasting yarn for the muzzle
- Small amount of dark yarn for facial embroidery
- Small amount of pink yarn, optional, for the nose
- 3.5 mm (E-4) crochet hook
- 4 mm (G-6) crochet hook
- Tapestry needle
- Scissors
- Stitch marker, optional
For a baby lovey, choose a soft yarn that can withstand regular washing.
Avoid novelty yarns that shed easily or have long fibers that could become wrapped around tiny fingers.
Crochet Abbreviations
This pattern uses standard US crochet terminology.
- ch — chain
- sc — single crochet
- hdc — half double crochet
- dc — double crochet
- sl st — slip stitch
- st/sts — stitch/stitches
- inc — increase
- dec — decrease
- rep — repeat
Gauge
Gauge is not critical for the blanket, but consistency is important.
For the bear head, approximately 18 sc x 20 rounds = 4 inches.
If your tension is significantly different, the finished bear head will be larger or smaller.
Finished Size
The completed lovey is approximately:
- 15–16 inches across
- Approximately 15 inches from the top of the bear head to the bottom edge
The finished size can vary depending on yarn and tension.
Crochet Bear Lovey Pattern
The project is made in three main parts:
- The blanket
- The bear head
- The ears and facial details
The head is attached securely to the center of the blanket after all pieces are completed.
Part 1: Crochet the Blanket
Using the blanket color and a 4 mm crochet hook, chain 61.
Row 1
Dc in the fourth chain from the hook.
Dc across the foundation chain.
(58 dc)
Row 2
Ch 2 and turn.
Dc in each stitch across.
(58 sts)
Row 3
Ch 2 and turn.
Dc in the next 2 stitches, 2 dc in the next stitch.
Repeat across the row.
Finish with dc in the remaining stitches as needed to maintain the row count.
Rows 4–18
Ch 2 and turn.
Dc in each stitch across.
Repeat until the blanket reaches approximately 12–13 inches in length.
Fasten off.
Important Note
Because crochet tension varies, use the blanket’s dimensions rather than the number of rows as the final guide.
The blanket should be approximately square or gently rectangular before the edging is added.
Blanket Edging
Reattach the blanket yarn at one corner.
Round 1
Ch 1.
Sc evenly around the entire blanket, placing approximately 3 sc in each corner.
Join with a sl st to the first sc.
Round 2
Ch 1.
Sc in each stitch around.
Work 3 sc in each corner.
Join with a sl st.
Fasten off.
Weave in the ends securely.
For a simple finished look, leave the edging as a clean single-crochet border.
Part 2: Crochet the Bear Head
The bear head is worked in joined rounds.
Using bear-colored yarn and the 3.5 mm hook, make a magic ring.
Round 1
Work 6 sc into the magic ring.
Join with a sl st.
(6 sts)
Round 2
Ch 1.
Work 2 sc in each stitch around.
Join.
(12 sts)
Round 3
Ch 1.
Sc in the next stitch, 2 sc in the next stitch.
Repeat around.
Join.
(18 sts)
Round 4
Ch 1.
Sc in the next 2 stitches, 2 sc in the next stitch.
Repeat around.
Join.
(24 sts)
Round 5
Ch 1.
Sc in the next 3 stitches, 2 sc in the next stitch.
Repeat around.
Join.
(30 sts)
Round 6
Ch 1.
Sc in the next 4 stitches, 2 sc in the next stitch.
Repeat around.
Join.
(36 sts)
Rounds 7–12
Ch 1.
Sc in each stitch around.
Join at the end of each round.
(36 sts)
The piece should now resemble a small rounded bear head.
Shape the Bear Head
Begin decreasing to close the lower portion of the head.
Round 13
Ch 1.
Sc in the next 4 stitches, sc2tog.
Repeat around.
Join.
(30 sts)
Round 14
Ch 1.
Sc in the next 3 stitches, sc2tog.
Repeat around.
Join.
(24 sts)
At this point, add the stuffing.
Use small amounts of fiberfill at a time and distribute it evenly.
Do not overstuff the head. It should be firm enough to hold its shape but not hard.
Round 15
Ch 1.
Sc in the next 2 stitches, sc2tog.
Repeat around.
Join.
(18 sts)
Round 16
Ch 1.
Sc in the next stitch, sc2tog.
Repeat around.
Join.
(12 sts)
Round 17
Sc2tog around.
(6 sts)
Fasten off, leaving a long yarn tail.
Use the tapestry needle to close the remaining opening.
Weave the yarn through the stitches, pull gently to close, and secure the end inside the head.
Crochet Bear Ears
Make two ears.
Using bear-colored yarn, make a magic ring.
Round 1
Work 6 sc into the ring.
Join.
(6 sts)
Round 2
Work 2 sc in each stitch around.
Join.
(12 sts)
Round 3
Sc in each stitch around.
Join.
(12 sts)
Fasten off, leaving a long tail for sewing.
Do not stuff the ears.
Flatten each ear slightly and sew it to the upper sides of the bear head.
Position them symmetrically before making the final stitches.
Crochet Bear Muzzle
Using a lighter contrasting color, make a magic ring.
Round 1
Work 6 sc into the ring.
(6 sts)
Round 2
Work 2 sc in each stitch around.
(12 sts)
Round 3
Sc in the next stitch, 2 sc in the next stitch.
Repeat around.
(18 sts)
Fasten off, leaving a sewing tail.
Do not heavily stuff the muzzle.
Place it toward the lower center of the bear’s face and sew it securely in place.
Embroider the Bear Face
For a baby lovey, embroidered facial details are preferable to detachable plastic safety eyes, buttons, beads, or other small pieces.
Using dark yarn:
- Embroider two small eyes.
- Add a small triangular or oval nose.
- Stitch a short line downward from the nose.
- Add two small curved lines for the mouth.
Keep all embroidered details firmly secured.
Weave the ends into the back of the head and trim the excess yarn.
Attach the Bear to the Blanket
Place the bear head at the center of the blanket.
The lower portion of the bear head should sit securely against the center of the blanket.
Using the long yarn tail from the head, sew around the base of the head.
Work through several stitches of both the bear and blanket to create a strong attachment.
Go around the entire base more than once if necessary.
Check the attachment carefully before giving the lovey to a baby.
Optional Blanket Border
For a more decorative finish, add another round around the blanket.
Attach contrasting yarn to one corner.
Decorative Border
Ch 1.
Sc in the first stitch.
Skip the next stitch, 3 dc in the next stitch, skip the next stitch, sc in the next stitch.
Repeat along each side.
At the corners, add enough stitches to keep the blanket lying flat.
Join with a sl st.
Fasten off and weave in the ends.
For a minimalist baby lovey, however, the plain single-crochet border is perfectly lovely.
Color Ideas for a Crochet Bear Lovey
Classic Teddy Bear
- Medium brown bear
- Cream muzzle
- Beige blanket
Neutral Nursery
- Taupe bear
- Ivory muzzle
- Cream blanket
Soft Pink
- Warm beige bear
- Blush muzzle
- Pale pink blanket
Woodland Theme
- Dark brown bear
- Cream muzzle
- Sage green blanket
Modern Monochrome
- Charcoal bear
- Light gray muzzle
- White blanket
Tips for Making the Bear Lovey
Keep the Bear Head Firmly Attached
The head is the focal point of the lovey, so take your time when sewing it to the blanket.
Work through multiple stitches rather than attaching it with only a few points.
Use Embroidered Features
For baby projects, embroidered facial details are a simple way to avoid loose small components.
Don’t Overstuff the Head
Too much stuffing can make the bear head excessively firm and can distort its shape.
Add small amounts gradually.
Check Your Stitch Counts
The bear head depends on evenly spaced increases and decreases.
If your stitch count changes unexpectedly, correct it before continuing to the next round.
Secure Every Yarn End
Baby items are washed and handled frequently.
Weave in ends thoroughly and trim only after the yarn is secure.
Common Mistakes
The Bear Head Is Lopsided
Uneven increases or accidentally skipping stitches can cause the head to become asymmetrical.
Count your stitches at the end of each increase round.
The Head Is Too Small
Your tension may be tighter than the stated gauge.
Try a slightly larger hook or make another increase round before beginning the straight rounds.
The Head Is Too Large
Use a smaller hook or reduce the number of increase rounds.
The Blanket Is Curling
If the blanket curls or ripples, check your tension.
Too many or too few stitches can also cause the fabric to distort.
Keep the corner increases consistent.
Baby Lovey Safety
A crochet lovey intended for a baby should be made and used with care.
For the safest construction:
- Use securely embroidered facial features.
- Avoid buttons, beads, plastic eyes, bells, ribbons, or other detachable decorations.
- Secure all yarn tails thoroughly.
- Inspect the bear head and blanket attachment regularly.
- Check for loose stitches, damaged yarn, or detached components.
- Use a soft, washable yarn appropriate for baby items.
A lovey should be treated as a comfort object rather than a toy. Follow age-appropriate sleep and supervision recommendations, and do not leave a loose lovey with an unattended or sleeping infant.
Frequently Asked Questions
Is this crochet bear lovey beginner-friendly?
The blanket is beginner-friendly, while the stuffed bear head requires a little more experience with crocheting in the round, increasing, decreasing, stuffing, and sewing.
How much yarn does a crochet bear lovey use?
The amount varies according to yarn weight, hook size, tension, and finished blanket size. This pattern uses approximately 150–200 yards for the blanket plus approximately 50 yards for the bear head.
Can I make the bear a different animal?
Yes. The same basic construction can be adapted into other animals.
Change the ear shape and colors to create a bunny, puppy, kitten, fox, or other woodland-inspired lovey.
Can I make the blanket larger?
Yes. Increase the number of starting chains and continue working rows until the blanket reaches your preferred dimensions.
Remember that a larger blanket will require additional yarn.
Can I sell finished crochet bear loveys?
Yes, you can sell finished items made from an original crochet pattern. Make sure your product photographs, descriptions, and pattern text are your own.
Final Thoughts
This Crochet Bear Lovey is a charming handmade project that combines a simple blanket with an adorable little teddy bear. The design is easy to personalize with different blanket colors, bear shades, and border styles.
For a baby shower gift, pair the lovey with a crochet baby hat or booties in matching colors. For a timeless nursery keepsake, choose neutral shades and embroidered facial features.
Most importantly, take extra care with the construction and regularly inspect any handmade baby item for loose parts or damaged stitches before use.