Bumblebee Baby Booties Crochet Pattern
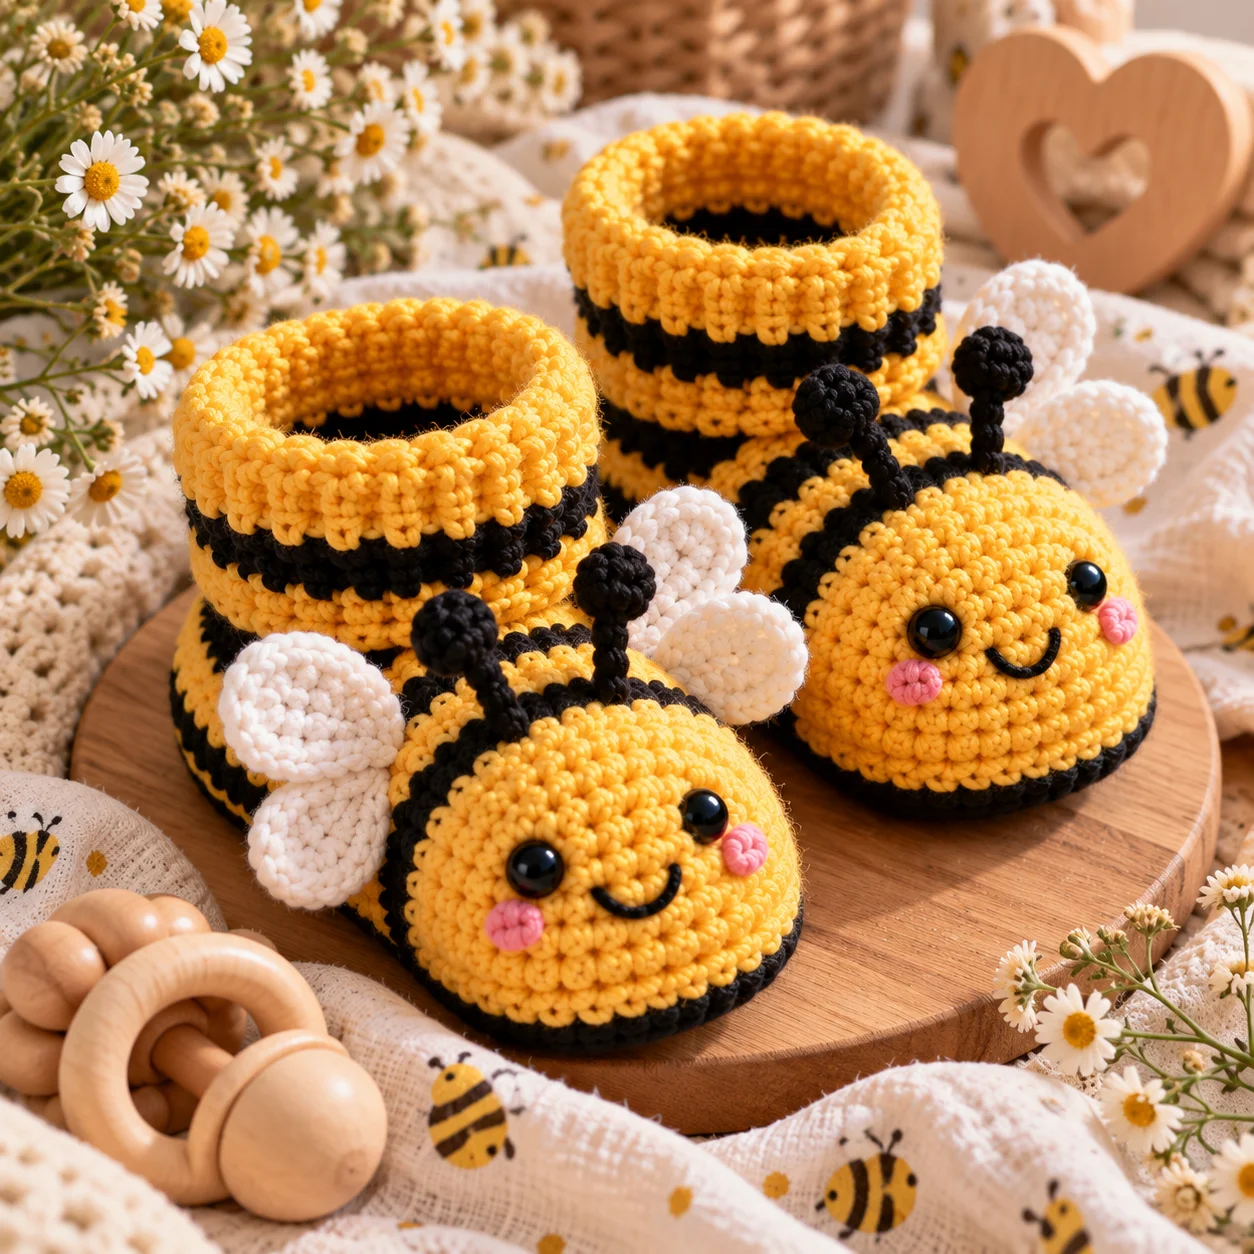
These adorable Bumblebee Baby Booties are a sweet little crochet project for babies and toddlers. With a rounded sole, cozy upper, striped cuff, and tiny bee-inspired details, they make a lovely handmade baby shower gift or a cheerful addition to a little one’s wardrobe.
The booties are worked from the sole upward, so you can easily customize the colors and add your own decorative touches.
This pattern is written in US crochet terminology and is designed for approximately 0–3 months.
Project Overview
- Skill level: Easy to intermediate
- Size: Approximately 0–3 months
- Finished sole: About 4 inches long
- Yarn: Worsted-weight (#4)
- Hook: 4.0 mm
- Construction: Sole worked upward
- Colors: Yellow and black
- Terminology: US crochet terms
Because babies’ feet vary, compare the finished sole with the baby’s foot measurement whenever possible.
Materials
- Yellow worsted-weight (#4) yarn
- Black worsted-weight (#4) yarn
- Small amount of white yarn
- 4.0 mm crochet hook
- Yarn needle
- Scissors
- Stitch marker
- Measuring tape
Choose a soft, washable yarn suitable for baby clothing.
Crochet Abbreviations
- ch – chain
- sl st – slip stitch
- sc – single crochet
- hdc – half double crochet
- dc – double crochet
- inc – increase
- dec – decrease
- BLO – back loop only
- st/sts – stitch/stitches
Gauge
Approximately 16 sc x 18 rows = 4 inches.
For baby booties, the finished sole measurement is more important than exact gauge. Adjust your hook size if necessary.
Finished Size
Approximate sole measurements:
- Length: 4 inches
- Width: 2 inches
The bootie should fit comfortably without squeezing the baby’s foot.
Bumblebee Baby Booties Pattern
Make 2 booties.
The sole is worked in yellow yarn.
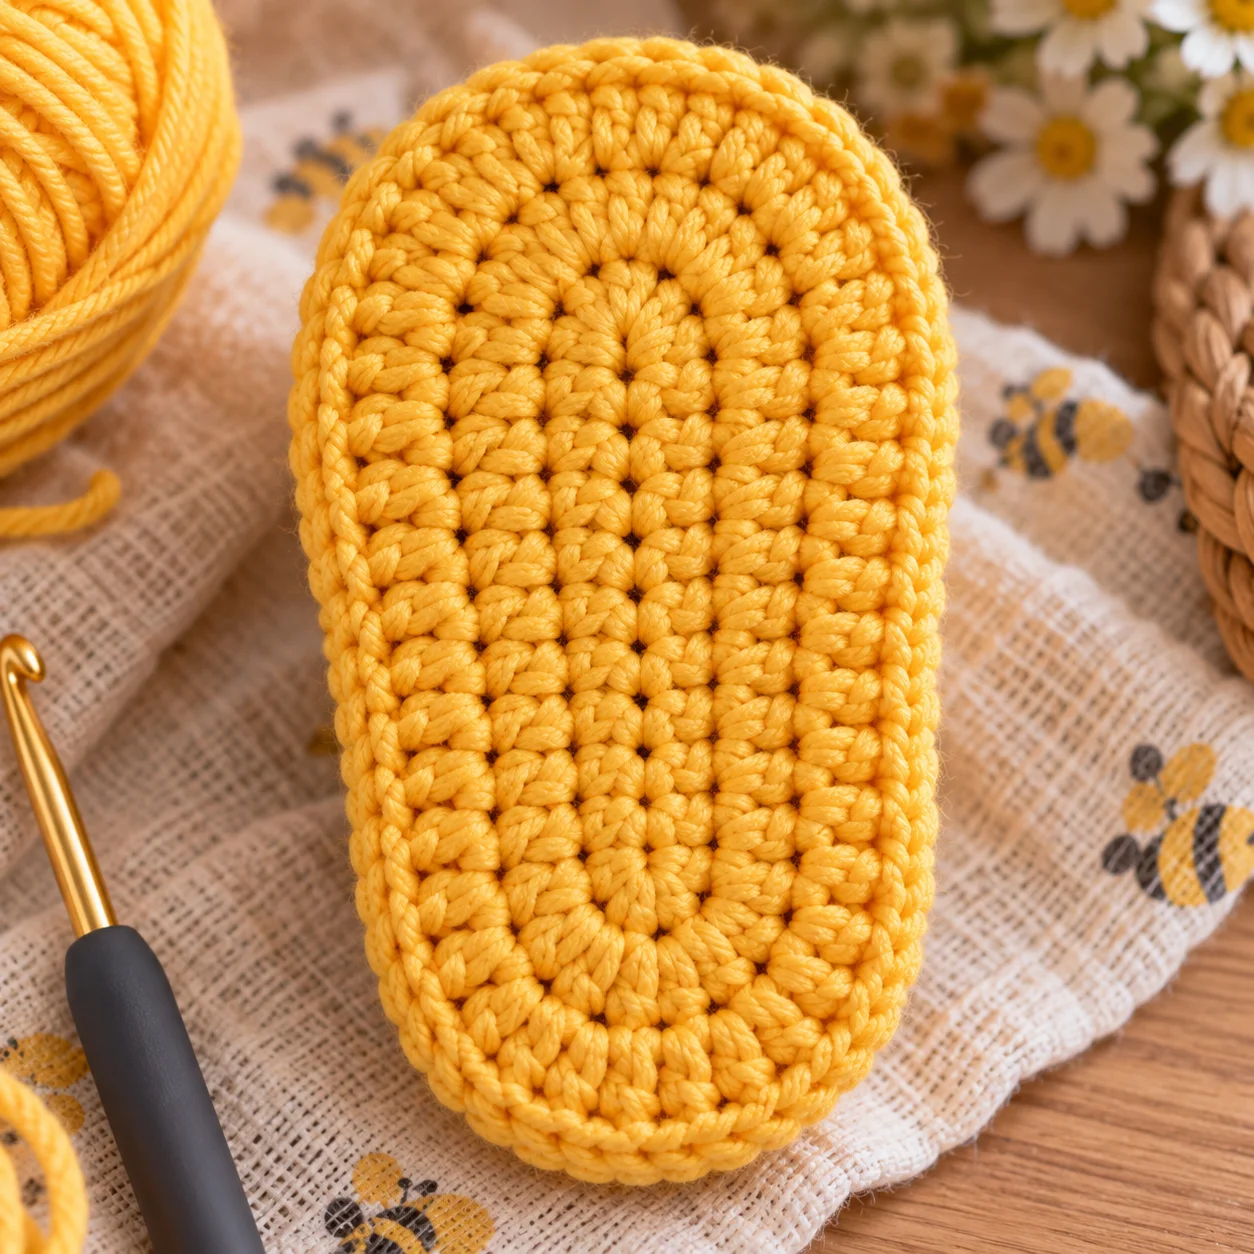
Sole
With yellow yarn, ch 9.
Round 1
Sc in the 2nd ch from hook and in the next 6 chains.
Work 4 sc in the last chain.
Working along the opposite side of the foundation chain, sc in the next 6 chains.
Work 3 sc in the final chain.
Sl st to the first sc.
(20 sts)
Round 2
Ch 1.
Sc in the next 7 sts.
Work 2 sc in each of the next 4 sts.
Sc in the next 6 sts.
Work 2 sc in each of the next 3 sts.
Sl st to the first sc.
(28 sts)
Round 3
Ch 1.
Sc in the next 8 sts.
2 sc in next st, sc in next st.
Repeat this sequence 3 times.
Sc in the next 6 sts.
2 sc in next st, sc in next st.
Repeat 2 times.
Work 2 sc in the final stitch.
Sl st to the first sc.
(34 sts)
Fasten off if you want a clean color change between the sole and upper.
Upper
Join black yarn at the center back of the sole.
Round 4
Ch 1.
Working in the BLO, sc in each stitch around.
Sl st to the first sc.
(34 sts)
This back-loop-only round creates a small ridge and helps the upper turn upward.
Round 5
Change to yellow yarn.
Ch 1.
Sc in each stitch around.
Sl st to the first sc.
(34 sts)
Round 6
Change to black yarn.
Ch 1.
Sc in each stitch around.
Sl st to the first sc.
(34 sts)
Round 7
Change to yellow yarn.
Ch 1.
Sc in each stitch around.
Sl st to the first sc.
(34 sts)
The alternating yellow and black rounds create the classic bumblebee stripe effect.
Shaping the Toe
Round 8
Change to black yarn.
Ch 1.
Sc in the next 10 sts.
Hdc in the next 4 sts.
Hdc2tog twice.
Hdc in the next 4 sts.
Sc in the remaining 10 sts.
Sl st to the first sc.
(32 sts)
Round 9
Change to yellow yarn.
Ch 1.
Sc in the next 10 sts.
Hdc in the next 3 sts.
Hdc2tog twice.
Hdc in the next 3 sts.
Sc in the remaining 10 sts.
Sl st to the first sc.
(30 sts)
The front of the bootie should now have a gently rounded shape.
Bumblebee Cuff
Round 10
Change to black yarn.
Ch 1.
Sc in each stitch around.
Sl st to the first sc.
(30 sts)
Round 11
Change to yellow yarn.
Ch 1.
Sc in each stitch around.
Sl st to the first sc.
(30 sts)
Round 12
Change to black yarn.
Ch 1.
Working in the BLO, sc in each stitch around.
Sl st to the first sc.
(30 sts)
Round 13
Change to yellow yarn.
Ch 1.
Sc in each stitch around.
Sl st to the first sc.
(30 sts)
Fasten off.
Weave in all ends securely.
Folding the Cuff
Fold the upper edge of the bootie outward slightly to create a small cuff.
The black and yellow stripes should remain visible.
You can leave the cuff unfolded for a taller bootie or fold it down for a more defined bumblebee look.
Optional Bee Wings
For a cute finishing touch, make two small white wings for each bootie.
Make 4 wings total.
Using white yarn:
Round 1
Make a magic ring.
Ch 2.
Work 6 hdc into the ring.
Sl st to the first hdc.
(6 sts)
Round 2
Ch 1.
Work 2 sc in each stitch around.
Sl st to the first sc.
(12 sts)
Fasten off, leaving a sewing tail.
Flatten each wing gently.
Attaching the Wings
Place two wings on the outer side of each bootie, near the upper cuff.
Sew each wing securely using the yarn tail.
Make several passes through both the wing and bootie fabric.
Keep the wings flat rather than leaving them loosely hanging.
For babies, embroidered or crocheted decorations should be firmly secured and regularly inspected.
Optional Bee Antennae
For an even more playful design, embroider two short black antennae near the front of the cuff.
Use black yarn and a yarn needle.
Make two short curved lines.
Secure the yarn firmly inside the bootie.
Avoid adding long cords or loose strands.
Optional Small Bee Face
If desired, embroider a tiny bee-inspired face onto the front of each bootie.
Use black yarn to make:
- Two tiny eyes
- A small curved smile
Keep the details embroidered rather than using buttons or beads.
Finishing
Weave all yarn tails securely into the wrong side of the booties.
Trim excess yarn.
Gently shape each bootie with your fingers.
Compare both booties to make sure they are approximately the same size.
If necessary, lightly block them according to the care instructions for your yarn.
Color Variations
You don’t have to use traditional yellow and black.
Try these combinations:
Classic Bumblebee
- Golden yellow
- Black
- White wings
Honey Bee
- Mustard
- Chocolate brown
- Cream wings
Soft Baby Bee
- Pale yellow
- Warm gray
- Ivory wings
Spring Bee
- Bright yellow
- Sage green
- Cream wings
Neutral Nursery
- Oatmeal
- Charcoal
- Beige wings
Tips for Making Baby Booties
Measure the sole
Baby feet grow quickly, so compare the finished sole with the intended baby’s foot measurement whenever possible.
Keep your stitches even
Uneven tension can make one bootie noticeably larger than the other.
Don’t overstuff the booties
These are wearable booties rather than stuffed toys. They should remain soft and flexible.
Secure every decoration
Small crocheted pieces can become loose with repeated use, so sew them down securely.
Check the fit
The bootie should stay comfortably on the foot without squeezing the ankle.
Common Mistakes
The bootie is too large
Your gauge may be looser than expected. Try a smaller hook or lighter yarn.
The sole curls
Check the increase placement in the sole. Too few increases can cause the sole to curl upward.
The upper flares outward
Make sure the stitch count remains consistent after the sole.
The toe looks pointed
Check that your decreases are centered across the front section rather than being spread randomly around the bootie.
The stripes don’t line up
Change colors at the same point in each round and carry or weave in yarn neatly rather than allowing loose strands to cross the inside.
Safety
These booties are intended for babies, so inspect them carefully before every use.
Do not use loose buttons, beads, charms, bells, or other detachable decorations. Small parts can create choking hazards.
Make sure crocheted wings and embroidered details are securely attached. Inspect the booties regularly for loose stitches, damaged yarn, or detached decorations.
Never leave a baby unattended with a damaged handmade item.
These soft booties are not intended to provide reliable traction on smooth floors. They should not replace properly designed non-slip footwear for walking children.
Frequently Asked Questions
What size are these bumblebee booties?
The pattern is designed for approximately 0–3 months, with a finished sole of about 4 inches. Baby foot sizes vary, so measuring is recommended.
Can I make larger booties?
Yes. Start with a longer foundation chain for the sole and adjust the increase rounds accordingly. The upper should then be worked to match the new sole circumference.
Can I use DK yarn?
Yes, but the booties will be smaller and lighter. Work from the desired finished measurements rather than relying on the stitch counts provided for worsted-weight yarn.
Can I leave off the wings?
Absolutely. The yellow-and-black striped booties look cute even without additional decorations.
Are these suitable for newborn photos?
They can be used as a photo accessory with appropriate supervision. Make sure they are loose enough to remain comfortable and remove them if the baby shows any signs of discomfort.
Final Thoughts
These Bumblebee Baby Booties are a fun way to combine practical crochet with a cheerful little character theme. The yellow-and-black stripes create the recognizable bee look, while the optional white wings and embroidered details add an extra touch of sweetness.
Try different shades of yellow and brown to create your own collection of tiny handmade bee booties for baby gifts, spring wardrobes, or a special handmade photo set.